
Chiseiko Essential Swatches Pro
Additional Variation Images
Pro module. Requires Chiseiko Essential Swatches Pro with an active license. Enable the "Additional Variation Images" module at WooCommerce → Chiseiko Essential Swatches Pro → Modules.
What Does This Module Do?
WooCommerce lets you give each variation one image. So if you sell a t-shirt in Red, Blue, and Green, you can set a single photo for each color. When a shopper picks "Red," the main product image swaps to the red shirt — and that's it. They only ever see that one photo.
But most products are better sold with several photos per color: a front view, a back view, a close-up of the fabric, a lifestyle shot. WooCommerce on its own has no way to do that.
Additional Variation Images fixes this. It gives each variation its own full gallery of images. When a customer selects a swatch (for example, the Red color), the entire product gallery — main image plus all the thumbnails below it — switches to show that variation's dedicated set of photos. They can then browse through every image you uploaded for that specific color.
In short:
- WooCommerce alone: one image per variation
- With this module: a complete photo gallery per variation, shown automatically when the swatch is selected
This is configured per product, right on the product edit screen — there is no separate settings tab to fill in. It works on variable products only.
Enabling the Module
- Go to WooCommerce → Chiseiko Essential Swatches Pro → Modules.
- Check the box next to Additional Variation Images.
- Click Save Modules.
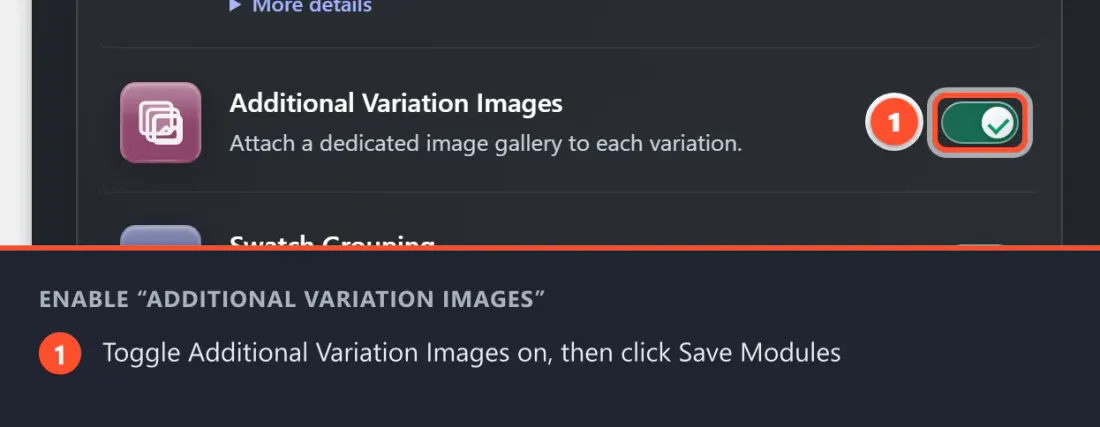
That's all that's needed to switch the feature on. The per-variation gallery field (described below) will now appear on your variable products.
Adding Images to a Variation
These galleries are set up individually, on each product that needs them.
- Go to Products and open (or create) the variable product you want to add images to.
- Scroll down to the Product data box and make sure the product type is set to Variable product.
- Click the Variations tab on the left side of the Product data box.
- Click a variation row to expand it. The variation's options open up, showing its built-in single image, SKU, price, and other settings.
- Just below the variation's standard image and options, you'll see a new section titled Variation Gallery Images, with the note "Shown in the product gallery when this variation is selected. Drag to reorder."
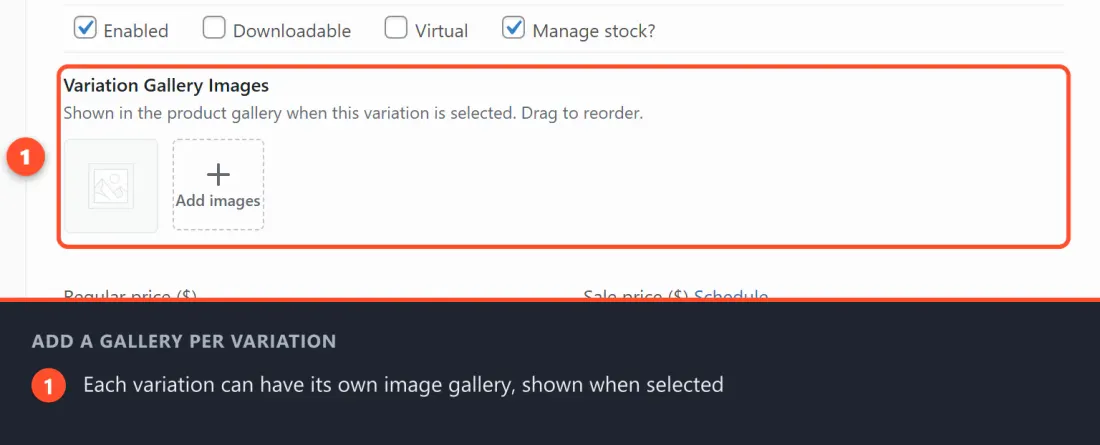 6. Click the Add images button (the tile with a + sign).
7. The WordPress Media Library opens with the title "Add variation gallery images." Select one or more images — hold Ctrl (Windows) or Cmd (Mac) to pick several at once, or upload new ones.
8. Click the Add to gallery button in the bottom-right of the Media Library window.
9. The chosen images appear as a row of thumbnails inside the Variation Gallery Images section.
6. Click the Add images button (the tile with a + sign).
7. The WordPress Media Library opens with the title "Add variation gallery images." Select one or more images — hold Ctrl (Windows) or Cmd (Mac) to pick several at once, or upload new ones.
8. Click the Add to gallery button in the bottom-right of the Media Library window.
9. The chosen images appear as a row of thumbnails inside the Variation Gallery Images section.
- To reorder: drag a thumbnail left or right into the position you want. The order you set here is the order shoppers see.
- To remove one: hover over a thumbnail and click the small × (Remove image) button in its corner.
- Repeat steps 4–9 for any other variations that should have their own gallery. You don't have to fill in every variation — only the ones you want.
- When you're done, click Save changes at the bottom of the Variations panel, then click Update on the product to publish.
Tip: A variation with no gallery images added simply behaves the normal WooCommerce way (showing its single variation image, or the main product image). You can mix and match.
What the Customer Experience Looks Like
- A shopper opens your variable product page. They see the product's default gallery to start with.
- They click a swatch — say, the Blue color.
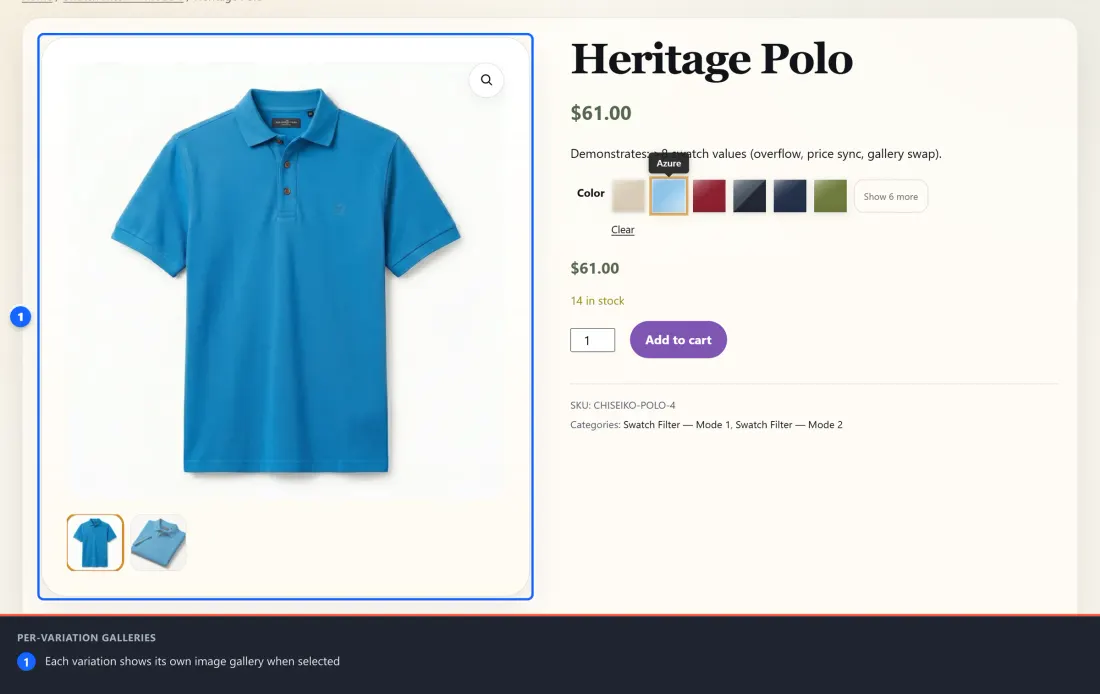
- The whole product gallery updates to the set of images you uploaded for the Blue variation: the main large image and every thumbnail below it switch to Blue's photos.
- The shopper can click through the thumbnails to browse all of that variation's images, exactly like a normal product gallery — including zoom and lightbox if your theme supports them.
- If they then switch to a different swatch (say, Green), the gallery swaps again to Green's image set. If they pick a variation that has no extra gallery, the gallery returns to the normal single image / default gallery.
The swap happens instantly, with no page reload. If a shopper arrives via a link that already has a color pre-selected, the correct variation's gallery is shown right away on the first load — no flicker.
Tips for Best Results
- Use consistent image sizes and proportions. Galleries look most polished when every photo for a variation shares the same dimensions and aspect ratio, so thumbnails line up neatly and the main image doesn't jump in size as shoppers browse.
- Set a main variation image too. Fill in WooCommerce's built-in single image for each variation (the standard image at the top of the variation row). It acts as the first/lead image and is used as a fallback wherever the full gallery isn't shown.
- Order matters. The first image in the gallery is what shoppers see immediately when they pick that swatch. Drag your strongest "hero" shot to the front.
- You don't need a gallery on every variation. Add extra images only where they help. Variations without a gallery fall back to normal WooCommerce behavior.
- Works alongside Instant Gallery Preview (Free). The Free plugin's hover image preview and this module complement each other — hover previews on the shop/archive cards, full galleries on the product page once a swatch is selected.
Frequently Asked Questions
Q: Is there a settings page for this module? A: No. Other than the on/off toggle under WooCommerce → Chiseiko Essential Swatches Pro → Modules, everything is configured per-product on the product edit screen, inside each variation. There are no global options to set.
Q: Does this work on simple products? A: No. This module is for variable products only, because it attaches galleries to individual variations. Simple products have a single gallery already.
Q: What happens to a variation I don't add images to? A: It behaves exactly as WooCommerce normally would — showing its single variation image, or the product's main image if no variation image is set.
Q: Where do the extra images come from? A: From your WordPress Media Library, the same place all your other product images live. You can pick existing images or upload new ones from the same window.
Q: Will this slow down my product pages? A: The module only does extra work on products that actually use a variation gallery, and the images load on demand as shoppers browse. Keeping your image files reasonably sized (as you would for any web image) keeps pages fast.
Q: I enabled the module but don't see the gallery field. Why? A: Make sure the product type is set to Variable product, then click the Variations tab and expand an individual variation — the Variation Gallery Images section appears below that variation's standard image and options, not at the top of the Variations panel.
Q: Can I reorder images after saving? A: Yes. Re-open the variation, drag the thumbnails into a new order, click Save changes, then Update the product.