
Chiseiko Essential Swatches Pro
Advanced Linked Products
Pro modules. Require Chiseiko Essential Swatches Pro with an active license, and the Linked Simple Products module (see Chapter 6). Enable these at WooCommerce → Chiseiko Essential Swatches Pro → Modules.
Overview
Chapter 6 showed how to group separate simple products together so a row of swatches lets customers jump between color variants. This chapter covers four add-on modules that build extra behavior on top of that base feature:
| Add-on | What it adds |
|---|---|
| Linked Canonical Shield | Consolidates the SEO ranking power of a linked group onto one "primary" product |
| Linked Archive Swatches | Shows the linked swatch strip and a "View Collection" button on shop/category cards, and hides duplicate group members from the grid |
| Linked Multi-Attribute | Turns a linked group into a multi-row swatch matrix (for example a Color row plus a Size row) |
| Linked Reviews | Pools every member's reviews into one shared collection with a combined star rating, shown on each product in the group |
All four require the Linked Simple Products module to be enabled. They read your existing linked groups — they cannot do anything on their own. If you turn Linked Simple Products off, these add-ons automatically go quiet too.
You can enable any combination of them. Each is a separate checkbox on the Modules screen.
Linked Canonical Shield
What it does
When you sell each color as its own product (Rose, Ivory, Black), search engines see several near-identical pages. They can't tell which one to rank, so they split your ranking power across all of them — which can hurt all of them.
The Canonical Shield fixes this. For every non-primary product in a linked group, it adds a hidden canonical tag in the page's HTML pointing at the group's primary product. This tells Google and other search engines "treat the primary product's page as the official one," so your ranking signals are consolidated onto a single URL.
The primary product is chosen automatically: it's the group member with the lowest product ID — in practice, the one you created first. You don't choose it manually.
How to enable
- Go to WooCommerce → Chiseiko Essential Swatches Pro → Modules and check Linked Canonical Shield, then Save Modules.
- Then turn on the setting described below — the module also has its own on/off switch so you can pause it per site without uninstalling.
Setting
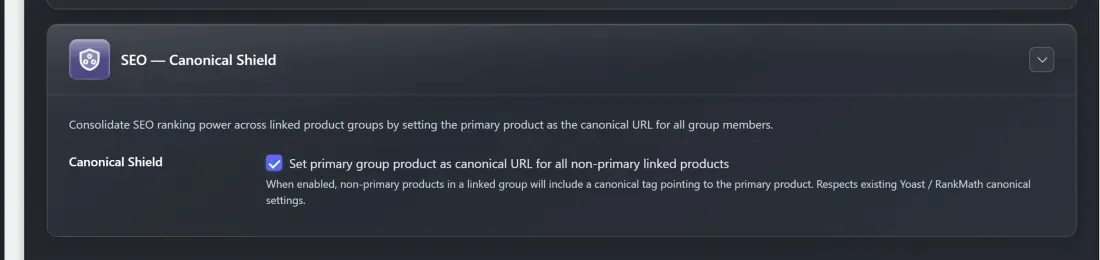
The toggle lives on the Display Settings tab, in the SEO — Canonical Shield card.
- Setting label: Canonical Shield
- Checkbox text: "Set primary group product as canonical URL for all non-primary linked products"
Tick it and click Save to activate the shield. When it's off, the module stays installed but does nothing.
What search engines see
- On the primary product's page: nothing changes — it remains its own canonical.
- On every other product in the group: a
canonicaltag pointing to the primary product, so search engines consolidate ranking onto that one URL. - Customers see no difference — there's no visible change on the page. This is purely an SEO behind-the-scenes signal.
Works with your SEO plugin. If you already run Yoast SEO, Rank Math, All in One SEO, or SEOPress, the shield detects them and steps aside so it never produces a duplicate canonical tag. Those plugins stay in charge of canonicals on your site.
Linked Archive Swatches
What it does
The base Linked Simple Products module already shows swatch strips on the single product page. This add-on extends that to your shop and category grids (and to block themes that use the Products block). It does three things on the archive:
- Shows the linked swatch strip under each grouped product card, so customers can see all the colors before clicking in.
- Replaces the "Add to cart" button on grouped cards with a "View Collection" button (or, when AJAX add-to-cart is enabled, a "Select options" button). Clicking it takes the customer to the product page where they can choose.
- Hides duplicate group members from the grid. Instead of the same item appearing once per color and cluttering the shop, only one card per group is shown.
This keeps your shop page clean while still letting customers discover every color.
How to enable
Go to WooCommerce → Chiseiko Essential Swatches Pro → Modules, check Linked Archive Swatches, and click Save Modules. There is no separate settings tab for this module — it works automatically once enabled.
Turning it off restores stock WooCommerce behavior: every group member reappears on the shop grid as its own card.
What customers see
On your shop and category pages, each linked group now shows as a single product card with:
- A swatch strip beneath it showing every color in the group.
- A "View Collection" (or "Select options") button instead of the normal Add to cart button, linking through to the product.
Which member is shown as the visible card is chosen automatically — the module prefers the first in-stock member of the group, so customers always land on something they can actually buy. Out-of-stock colors still appear in the swatch strip with their usual unavailable marker.
Linked Multi-Attribute
What it does
A normal linked group treats each member as a single swatch — one color, one button. But sometimes a group varies along two attributes at once: a t-shirt sold as separate products for every Color and Size combination, for example, or a rug in several Materials and Finishes.
The Multi-Attribute add-on renders that kind of group as a matrix of separate swatch rows — for example a Color row and a Size row — instead of one flat strip. Customers pick a value in each row, and the page resolves which product in the group matches that combination.
How to set it up
There's no settings tab for this module — you configure it per linked group, right on the product edit screen. Inside the Swatches product-data panel (the same panel where you set up the linked group in Chapter 6) there is a Multi-Attribute Configuration section:
- Set the Swatch Mode. Use the Swatch Mode dropdown and choose Multi-attribute. (The other choices are Auto (single attribute) — the default — and Single attribute (legacy).)
- Scan for shared attributes. Click the Scan Group Products button. The plugin reads every product in the linked group and finds the product attributes they share (for example
ColorandSize). - Choose which attributes to use. A checklist of the found attributes appears. Tick the ones you want to drive the swatch rows.
- Pick the Primary attribute. Each attribute has a Primary radio button. The primary attribute is the one shown first, and it's the single row used in compact places like shop cards. For example, mark Color as primary.
- Save the product with Update.
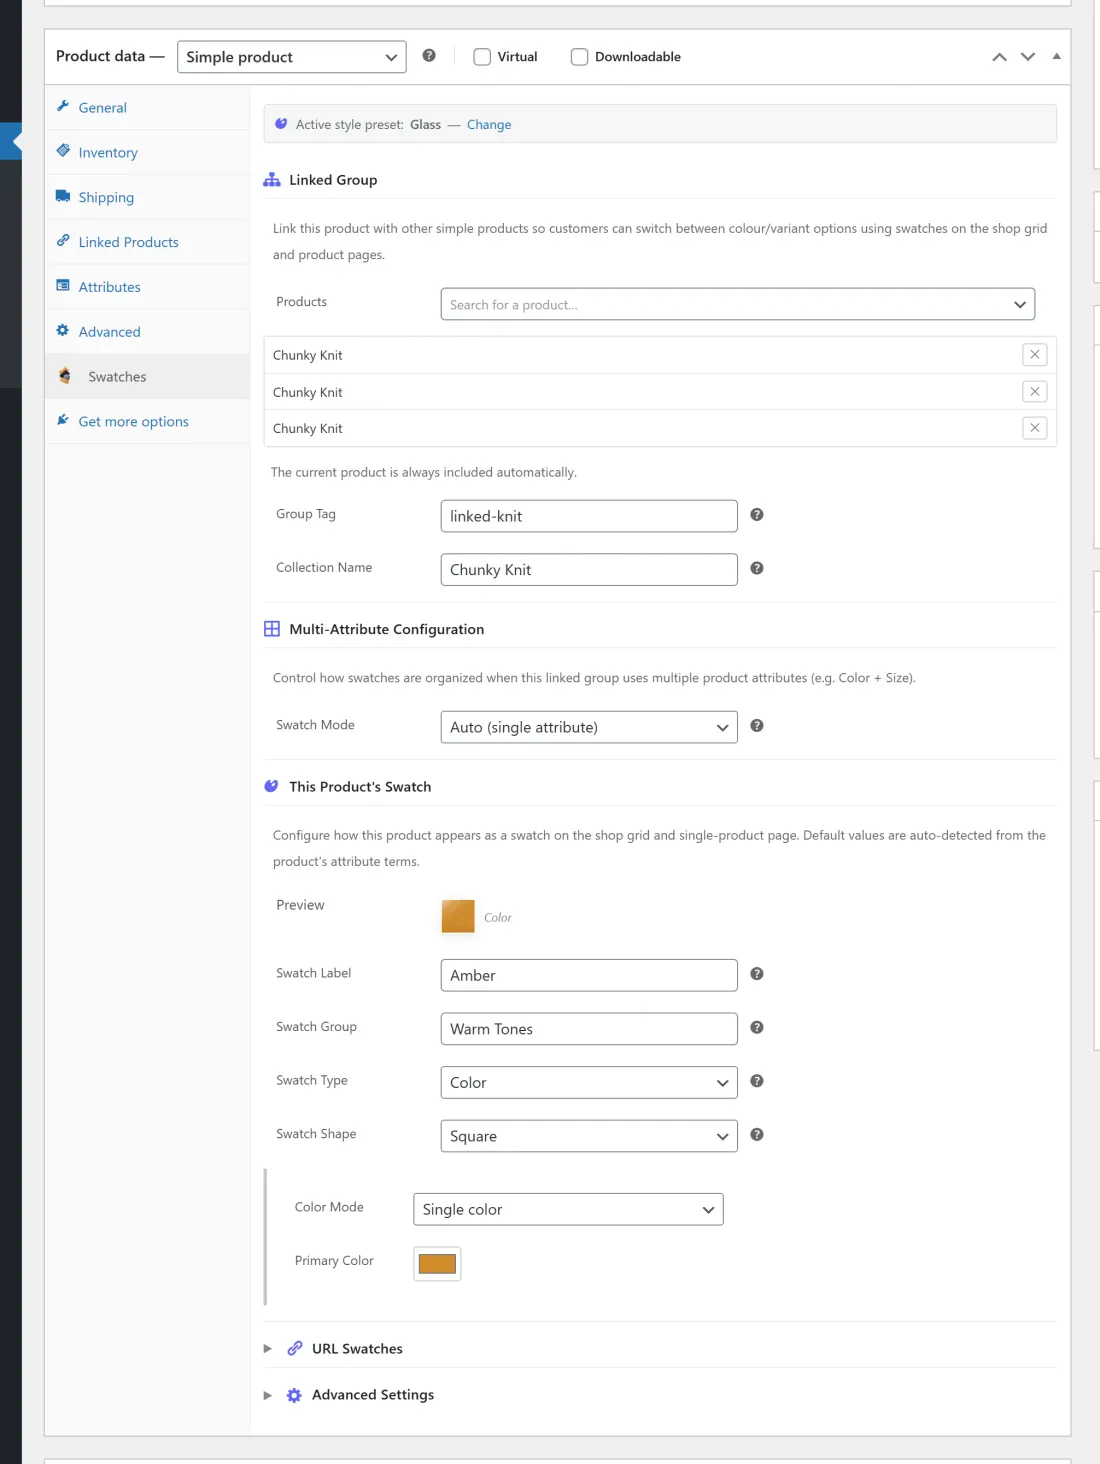
The attributes you select are stored on the group, and each member product supplies its own attribute values (its Color and its Size), so the plugin knows which combination each product represents.
What customers see
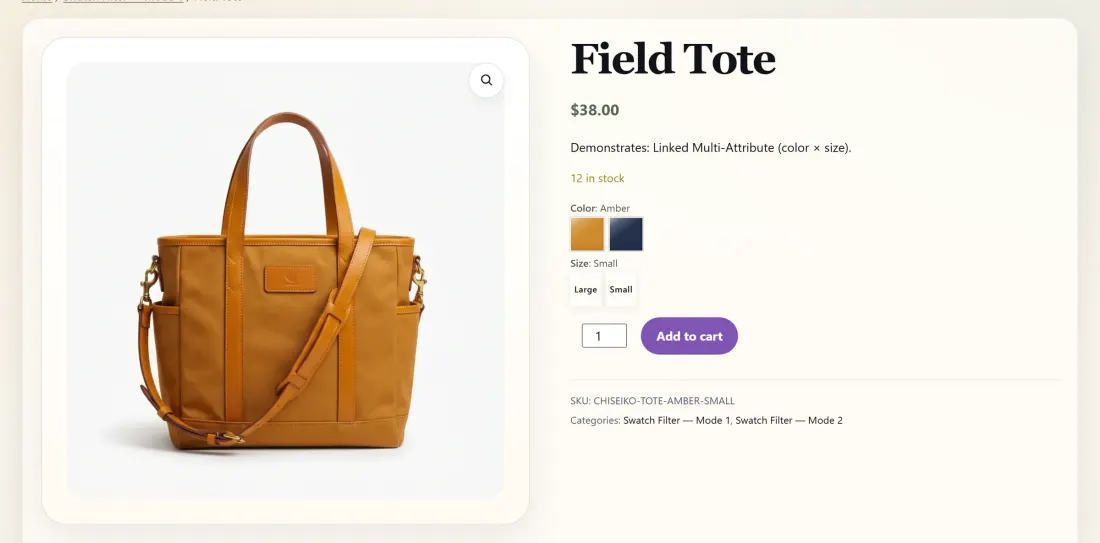
On the product page, instead of one swatch strip the customer sees a multi-row matrix — for example a row of Color swatches and a row of Size swatches, much like the options on a variable product. Choosing a value in each row selects the matching product in the group; the page then updates the image, price, and Add to cart for that specific combination.
On shop/category cards only the primary attribute row is shown (for example just the Colors), keeping the grid compact, with the full matrix available once the customer opens the product.
Note on large groups
Most groups render instantly because their data is built right into the page. But very large groups — more than 50 products — would be slow to assemble on every page load. For those, the module switches to a high-scale mode:
- A background job compiles the group's matrix (each member's link, image, price, and combination) after you save a product, instead of doing it while a customer waits.
- The storefront then loads the matrix through a lightweight REST request rather than rebuilding it live.
This all happens automatically. The only thing to know is that on the very first visit right after a large group is created or edited, the background job may not have finished yet — give it a moment (or revisit the product) and the full matrix appears. You don't configure any of this; the module decides based on group size.
Linked Reviews
What it does
When each color or variant is sold as its own product, customer reviews normally end up scattered — three reviews on the Rose product, one on Ivory, none yet on Black. To a shopper, a brand-new color looks untrusted even though the product line has plenty of happy customers.
Linked Reviews pools them. Every member of a linked group shows the same shared review collection and a combined star rating built from all of the group's reviews. A customer landing on any color sees the full social proof for the whole line.
- Reviews are native WooCommerce comments — nothing is duplicated or copied. The module resolves the union from the group's membership at display time and caches the result for performance.
- Each review stays attributed to the product it was actually written on, so nothing looks fabricated.
- The combined rating (stars, count, and breakdown) reflects every review across the group.
How to enable
- Go to WooCommerce → Chiseiko Essential Swatches Pro → Modules.
- Check the box next to Linked Reviews.
- Click Save Modules.
It is on by default and requires the Linked Simple Products module. There are no extra settings to configure — once the module is on, every linked group shares its reviews automatically.
What customers see: on any product in the group, the Reviews tab and the star rating near the title show the group's pooled reviews and combined rating, instead of just that one product's handful (or none).
Tips for Best Results
- Set up Linked Simple Products first. All four add-ons read your existing linked groups. If swatches aren't grouped yet (Chapter 6), there's nothing for these modules to enhance.
- Use the Canonical Shield only when each color really is a near-duplicate page. It's ideal for "same product, different color" listings. Don't use it to point genuinely different products at one another.
- Let your SEO plugin lead. If you run Yoast, Rank Math, AIOSEO, or SEOPress, the shield defers to them automatically — no conflict, and no action needed from you.
- For Multi-Attribute, name your attribute terms clearly. The Color and Size rows are built from your product attributes, so clear term names (Chapter 2) make for clear swatch rows.
- Re-scan after changing a group. If you add or remove members of a multi-attribute group, open the product and click Scan Group Products again so the attribute list stays accurate.
Frequently Asked Questions
Q: Do I have to enable all three? A: No. Each is an independent checkbox on the Modules screen. Enable only the ones you want — they just all require Linked Simple Products to be on.
Q: The Canonical Shield is enabled but I see no change on my product pages. Is it broken?
A: No. The shield is invisible to customers — it only adds a hidden canonical tag that search engines read. Check your page source for a canonical link pointing to the primary product. Also remember it stays silent if Yoast, Rank Math, AIOSEO, or SEOPress is active, because they own canonicals on your site.
Q: With Linked Archive Swatches on, why does only one card show per group on the shop page? A: That's intentional — it hides the duplicate color listings so the grid stays clean. The hidden colors still appear in the swatch strip and "View Collection" button on the one visible card. Turn the module off to bring all the separate cards back.
Q: My large multi-attribute group looks incomplete on the first visit after editing. Why? A: Groups over 50 products are compiled by a background job. Right after a save the job may still be running. Wait a moment and reload — the full matrix will appear once compilation finishes.
Q: Where do I configure the Multi-Attribute swatch matrix? A: On the product edit screen, in the Swatches panel's Multi-Attribute Configuration section — set Swatch Mode to Multi-attribute, click Scan Group Products, then choose your attributes and a primary. There is no separate settings tab.