
Chiseiko Essential Swatches Pro
Linked Simple Products
Pro module. Requires Chiseiko Essential Swatches Pro with an active license. Enable the "Linked Simple Products" module at WooCommerce → Chiseiko Essential Swatches Pro → Modules.
What Problem Does This Solve?
WooCommerce has two ways to sell color variants:
- Variable product — one listing, multiple colors as variations (covered in Chapter 3)
- Separate simple products — one listing per color (e.g., "Rose Face Cream", "Ivory Face Cream", "Black Face Cream" each as its own product)
Many stores use the second approach — especially stores that import inventory from a supplier, or that want each color to have its own product page for SEO reasons.
The problem: when a customer is on the "Rose Face Cream" page they have no easy way to discover or switch to the "Ivory Face Cream".
Linked Simple Products solves this by letting you group those separate products together. Once grouped, a row of swatch buttons appears on each product page. Clicking a swatch navigates the customer directly to that color's product page.
How to Set Up a Linked Product Group
Step 1 — Make sure the module is enabled
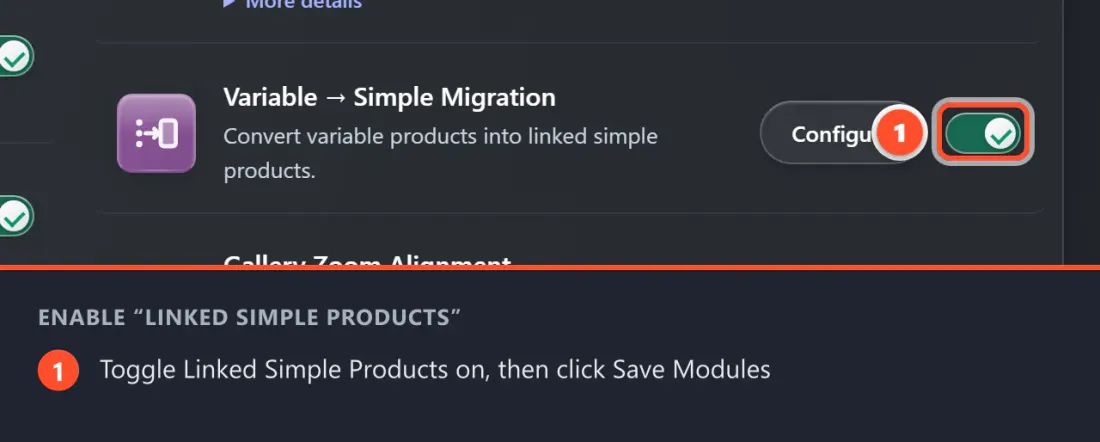
Go to WooCommerce → Chiseiko Essential Swatches Pro → Modules and check the box for Linked Simple Products. Click Save Modules.
Step 2 — Open the first product
- Go to Products and find one of the products you want to group (e.g., the "Rose Face Cream").
- Click to open the edit screen.
Step 3 — Open the Swatches tab
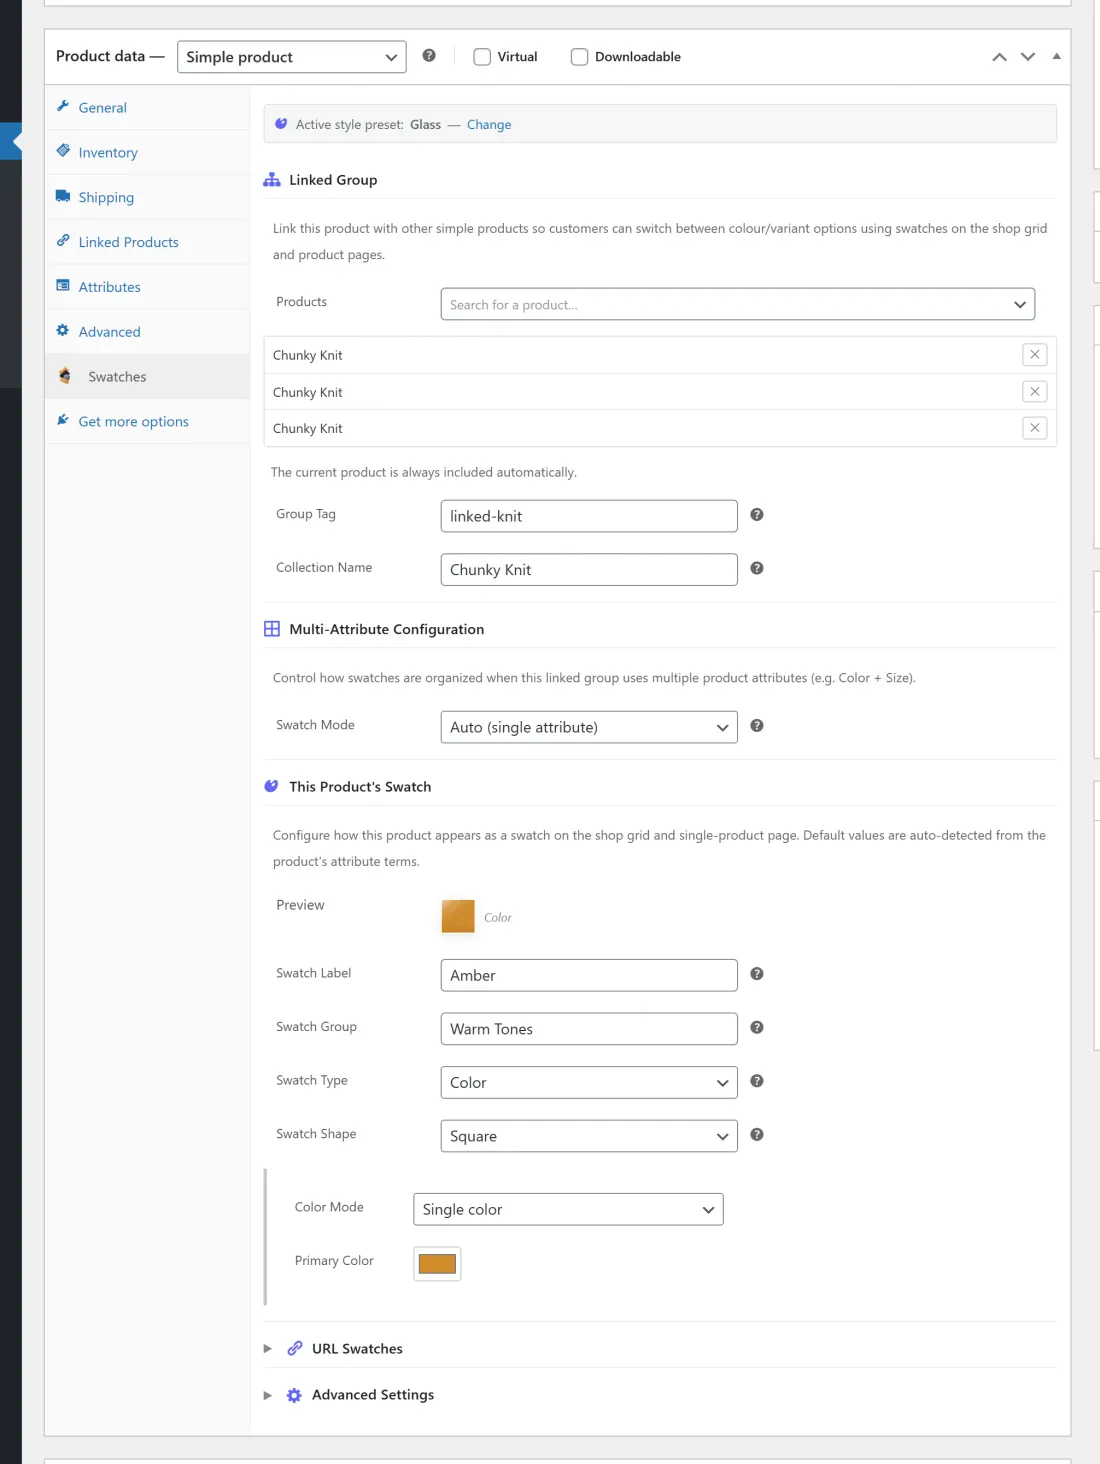
In the Product data box, click the Swatches tab on the left-hand list of tabs (it sits below "Advanced"). The first section is Linked Group.
Step 4 — Search for and add group members
In the Linked Group section:
- Click the Products search field.
- Start typing the name of another product you want in the group (e.g., type "Ivory").
- Select the matching product from the dropdown list that appears.
- Repeat to add as many products as you need in the group.
Tip: Give every product in the group the same Group Tag (e.g.
face-cream) and Collection Name. The current product is always included automatically.
Tip: There is no limit on how many products you can add to a group. Add all color variants — including the product you are currently editing.
Step 5 — Save the product
Click Update (or Publish if it's a new product).
Step 6 — Repeat for every product in the group
Open each of the other products in the group and repeat Steps 3–5, adding the same group members each time.
Every product must list ALL the other products in the group. For example, if Rose, Ivory, and Black are in a group:
- The Rose product lists: Ivory, Black (and itself is implied)
- The Ivory product lists: Rose, Black
- The Black product lists: Rose, Ivory
They all store the same list. This ensures the swatches appear correctly no matter which product page the customer lands on.
What It Looks Like in Your Store
Once the group is configured, visit any of the grouped product pages. Just above the Add to Cart button, you will see a row of swatch buttons — one per product in the group.
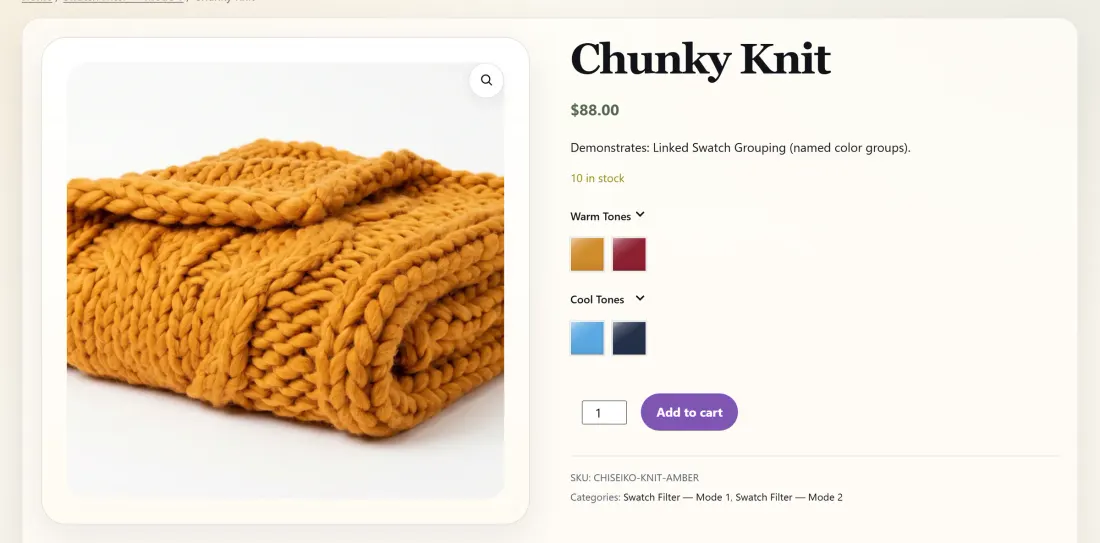
- The swatch for the current product is highlighted (it appears selected).
- Clicking any other swatch navigates directly to that product's URL.
- Each swatch shows a color circle, image, or text label based on how you configured the product's first attribute in Chapter 2.
- Swatches appear in alphabetical order by product name, so the order is predictable and consistent across all grouped products.
- Out-of-stock products in the group show their swatch with a visual indicator (by default a diagonal line through the swatch). Clicking an out-of-stock swatch does nothing — it is non-navigable. The exact appearance depends on your OOS Display Mode setting in Advanced Styling.
This gives customers a seamless way to browse color variants without going back to the shop grid.
Instant in-place switching
When a customer clicks another product's swatch, the page does not do a full reload. Chiseiko Essential Swatches Pro fetches a freshly server-rendered fragment of the target product and swaps three regions in place:
- the product gallery (images and zoom),
- the summary (title, rating, price, short description, and the Add to Cart form), and
- the product tabs (description, additional information, and reviews).
The browser address bar updates to the selected product's URL — so the page stays shareable and bookmarkable — but the customer never sees a white flash or a full page navigation. Because the fragment is rendered by the server using the same hooks your theme already runs, this works on both classic and block themes, and third-party content (badges, brand logos, and the like) is preserved automatically.
The browser's Back and Forward buttons work as expected: because the URL is updated with each swap, pressing Back returns the customer to the previously viewed color in the group, and Forward moves ahead again — just like normal navigation, but without the reload.
This behavior is automatic whenever Linked Simple Products is enabled — there's nothing to configure, and it applies to every linked group in your store.
If JavaScript is disabled, or the target product is password-protected, clicking a swatch falls back to a normal full-page navigation to that product's URL — so the feature degrades gracefully and never traps a customer.
How Swatches Are Determined for Each Product
The plugin automatically reads the attributes on each product to decide what to show:
| What's on the Product | What Appears as the Swatch |
|---|---|
| An attribute term with a Color swatch configured | A colored circle |
| An attribute term with an Image swatch configured | A small image thumbnail |
| An attribute term with no swatch, or no attributes | A text pill with the product name |
You do not need to do anything extra — as long as you configured your attribute terms in Chapter 2, the correct swatch will appear automatically.
Swatches on the Shop Page
When a customer views your Shop or category page, the linked group swatches can also appear below each product card in the grid, where clicking one navigates to that product.
This shop-grid behavior is provided by the separate Linked Archive Swatches module — make sure it is enabled (it requires Linked Simple Products) at WooCommerce → Chiseiko Essential Swatches Pro → Modules. See Chapter 21 for details.
This means customers can discover and compare colors directly from the browse experience, without visiting individual product pages.
Tip: When a group has an out-of-stock product at the top of its sort order, the shop card automatically shows the first in-stock product in the group instead — so customers always land on something they can actually buy. Out-of-stock swatches are still shown in the swatch strip with a visual indicator.
Tips and Best Practices
- Keep the groups consistent. All products in a group should represent the same product in different colors. Mixing unrelated products in a group will confuse customers.
- Name your products clearly. Since customers may arrive at any product in the group directly (via search or a link), each product should have a clear name like "Hydrating Face Cream – Rose Blush."
- Set up your attribute swatches first. The swatch buttons pull from your attribute configuration (Chapter 2). If an attribute term has no color or image set, the swatch falls back to a text pill with the product name.
- You can update the group at any time by editing any product in it and adding or removing members.
- Swatches are sorted alphabetically by product name. The order is determined by each grouped product's name (for example, "Ivory Face Cream" appears before "Rose Face Cream" before "Sage Face Cream"). If the order matters to you, name your products accordingly (or use a letter prefix like "A – Rose", "B – Ivory") so the most important color appears first.
Frequently Asked Questions
Q: Can I have a product in more than one group? A: It is technically possible but not recommended. A product should represent one consistent item. If a product appears in two groups, the swatch display may be confusing to customers.
Q: Does this work with out-of-stock products? A: Yes. Out-of-stock products in the group still appear as swatches so customers can see what all the options are. Their swatch is visually marked as unavailable (crossed out, blurred, or hidden depending on your OOS Display Mode setting) and clicking them does nothing. On the shop grid, the card will show the first in-stock product in the group as the default, so customers see a shoppable product right away.
Q: What if a product in my group gets deleted? A: The deleted product's swatch will simply no longer appear. No errors occur. The remaining group members continue to function normally.