
Chiseiko Essential Swatches Pro
Swatch Filter Widget
Pro module. Requires Chiseiko Essential Swatches Pro with an active license. Enable the "Swatch Filter Widget" module at WooCommerce → Chiseiko Essential Swatches Pro → Modules.
What Does This Module Do?
This module adds a visual filter to your shop and category pages. Instead of a plain checkbox list, shoppers narrow the product grid by clicking color circles, image thumbnails, or text pills — the same swatches you already set up for your attributes.
For example, a customer can click the red and blue color swatches and the grid instantly narrows to just the red and blue products. Click an active swatch again to remove it.
Key behaviour:
- It filters the standard WooCommerce product grid using WooCommerce's own layered-navigation links, so pagination, breadcrumbs, and "active filters" keep working.
- On modern WooCommerce, clicking a swatch updates the grid without a full page reload; older setups fall back to a normal reload — same result either way.
- It works with any product attribute you have set up (Color, Size, Material, etc.).
- An active-filter summary with a Clear all link sits at the top of the bar.
- Each swatch can show a product count so shoppers know how many items match.
Enabling the Module
- Go to WooCommerce → Chiseiko Essential Swatches Pro → Modules.
- Find Swatch Filter Widget and switch its toggle on.
- Save if prompted.
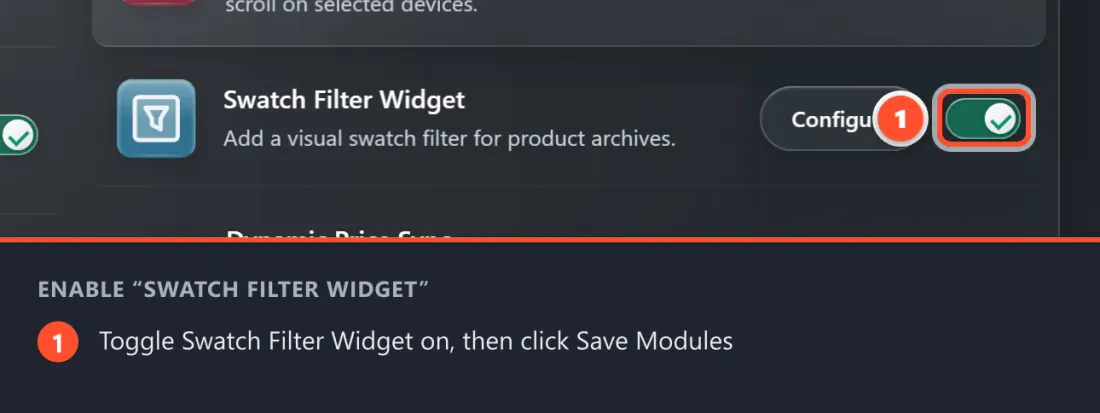
Once enabled, the placement options and the settings card on the Display Settings tab become available.
Adding the Filter to Your Shop Page
There are four real ways to place the filter. Pick whichever suits your site — most shops will use Auto-inject because it needs no page editing at all.
Option 1 — Auto-inject above the product grid (easiest)
This is the no-code option. CHISEIKOESSW drops a filter bar directly above your product grid on shop and category pages, on both classic and block themes.
- Go to WooCommerce → Chiseiko Essential Swatches Pro → Display Settings.
- In the Swatch Filter card, open the Injection sub-section.
- Under Auto-inject above product grid, tick each attribute you want to offer as a filter (e.g. Color, Size).
- Click Save Display Settings.
That's it — visit your shop page and the filter bar appears above the products.
Option 2 — WordPress block (block / Full-Site-Editing themes)
If you build your shop layout with the block editor:
- Edit the page or template (for example Appearance → Editor, or a normal page).
- Click the + (Add block) button.
- Search for CHISEIKOESSW Swatch Filter (it lives in the WooCommerce block category, with a funnel/filter icon).
- Insert it where you want the filter to appear — typically in a sidebar or above the product grid.
- In the block, choose which attribute it filters by, and save.
The block only renders on archive (shop / category) pages, so it stays invisible elsewhere.
Option 3 — Classic widget (sidebar widget areas)
If your theme uses classic widget areas (Appearance → Widgets):
- Go to Appearance → Widgets.
- Add the CHISEIKOESSW Swatch Filter widget to a sidebar or widget area (its description reads "Filter products by attribute using visual swatches").
- Configure the widget fields:
- Title — optional heading shown above the swatches.
- Attribute — choose which attribute this widget filters by.
- Query Type — OR (match any selected term) or AND (match all selected terms).
- Show product count — tick to display a count next to each swatch.
- Save the widget.
Add one widget per attribute if you want several filters in the sidebar.
Option 4 — Shortcode (anywhere)
For full control — inside page content, an archive description, a custom-HTML block, or a page builder — use the shortcode:
[chiseikoessw_swatch_filter attribute="pa_color"]
Supported shortcode options:
| Option | What it does | Example |
|---|---|---|
attribute |
Required. The attribute taxonomy to filter by, e.g. pa_color, pa_size. |
attribute="pa_size" |
query_type |
or (any) or and (all). Defaults to your Filter logic setting. |
query_type="and" |
show_count |
1 or 0 to show/hide the count. Defaults to your Show product count setting. |
show_count="0" |
title |
Optional heading above the swatches. | title="Filter by Color" |
The shortcode (like the block and widget) only outputs on shop / category archive pages. On any other page it renders nothing.
Configuring the Filter
Go to WooCommerce → Chiseiko Essential Swatches Pro → Display Settings and open the Swatch Filter card. The settings below match the options exactly as they appear there. Click Save Display Settings when you are done.
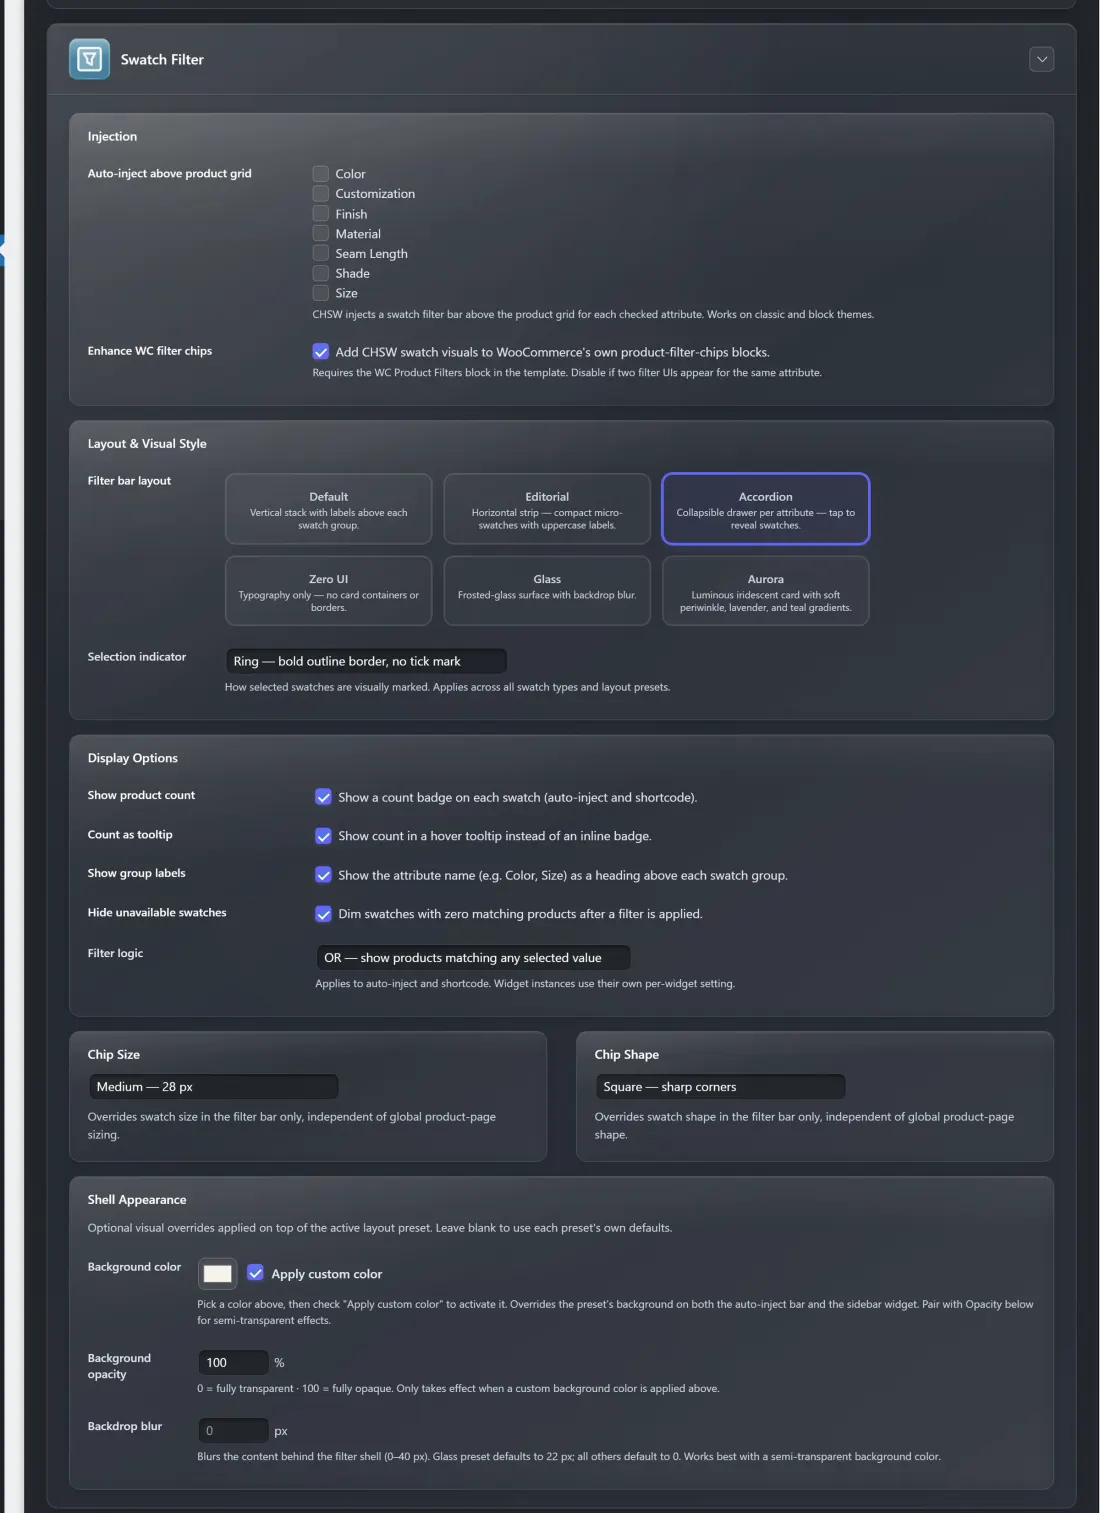
Setting: Auto-inject above product grid
Tick each attribute you want shown as a filter bar above the product grid. CHISEIKOESSW injects one filter group per checked attribute, on both classic and block themes.
Setting: Enhance WC filter chips
Adds CHISEIKOESSW swatch visuals to WooCommerce's own Product Filter chips blocks. Use this only if your template already contains WooCommerce's filter blocks. Disable it if two filter UIs appear for the same attribute — the settings screen warns you when both this and Auto-inject are active for the same attribute.
Setting: Filter bar layout
Choose the visual style of the injected filter bar. The presets are:
| Preset | Look |
|---|---|
| Default | Vertical stack with labels above each swatch group. |
| Editorial | Horizontal strip — compact micro-swatches with uppercase labels. |
| Accordion | Collapsible drawer per attribute — tap to reveal swatches. |
| Zero UI | Typography only — no card containers or borders. |
| Glass | Frosted-glass surface with backdrop blur. |
| Aurora | Luminous iridescent card with soft periwinkle, lavender, and teal gradients. |
Setting: Selection indicator
How a selected swatch is marked:
- Checkmark — tick mark on selected swatches (default).
- Ring — bold outline border, no tick mark.
- Fill — accent color fill, no tick mark.
This applies across all swatch types and layout presets.
Setting: Show product count
Shows a count badge on each swatch (applies to auto-inject and shortcode), so shoppers know how many products match each value.
Setting: Count as tooltip
Shows the count in a hover tooltip instead of an inline badge — handy for a cleaner look.
Setting: Show group labels
Shows the attribute name (e.g. Color, Size) as a heading above each swatch group. Turn off for a more minimal bar.
Setting: Hide unavailable swatches
Dims swatches that have zero matching products after a filter is applied, so customers don't click into empty results.
Setting: Filter logic
- OR — show products matching any selected value (default).
- AND — show products matching all selected values.
This applies to auto-inject and shortcode. Sidebar widget instances use their own per-widget Query Type setting instead.
Setting: Chip Size
Overrides swatch size in the filter bar only, independent of your global product-page sizing: Default (follows global), Small — 20 px, Medium — 28 px, or Large — 36 px.
Setting: Chip Shape
Overrides swatch shape in the filter bar only: Default (follows global), Circle — fully round, Rounded — soft corners, or Square — sharp corners.
Setting: Shell Appearance (Background color, Background opacity, Backdrop blur)
Optional visual overrides applied on top of the active layout preset. Leave blank to use each preset's own defaults.
- Background color — pick a color, then tick Apply custom color to activate it.
- Background opacity —
0= fully transparent,100= fully opaque. Only takes effect when a custom background color is applied. - Backdrop blur — blurs the content behind the filter shell (0–40 px). The Glass preset defaults to 22 px; all others default to 0. Works best with a semi-transparent background color.
What the Customer Experience Looks Like
- A shopper lands on your shop or category page and sees the filter bar with your color/image/text swatches.
- They click a swatch — say the blue color circle. The product grid narrows to blue products, and the swatch shows its selected indicator (checkmark, ring, or fill).
- The active-filters area shows their choices with a chip per selection and a Clear all link.
- They click more swatches to combine filters (OR/AND per your setting), and click any active swatch to remove it.
- The grid updates in place (on modern WooCommerce), and the URL updates too, so the filtered view can be bookmarked or shared.
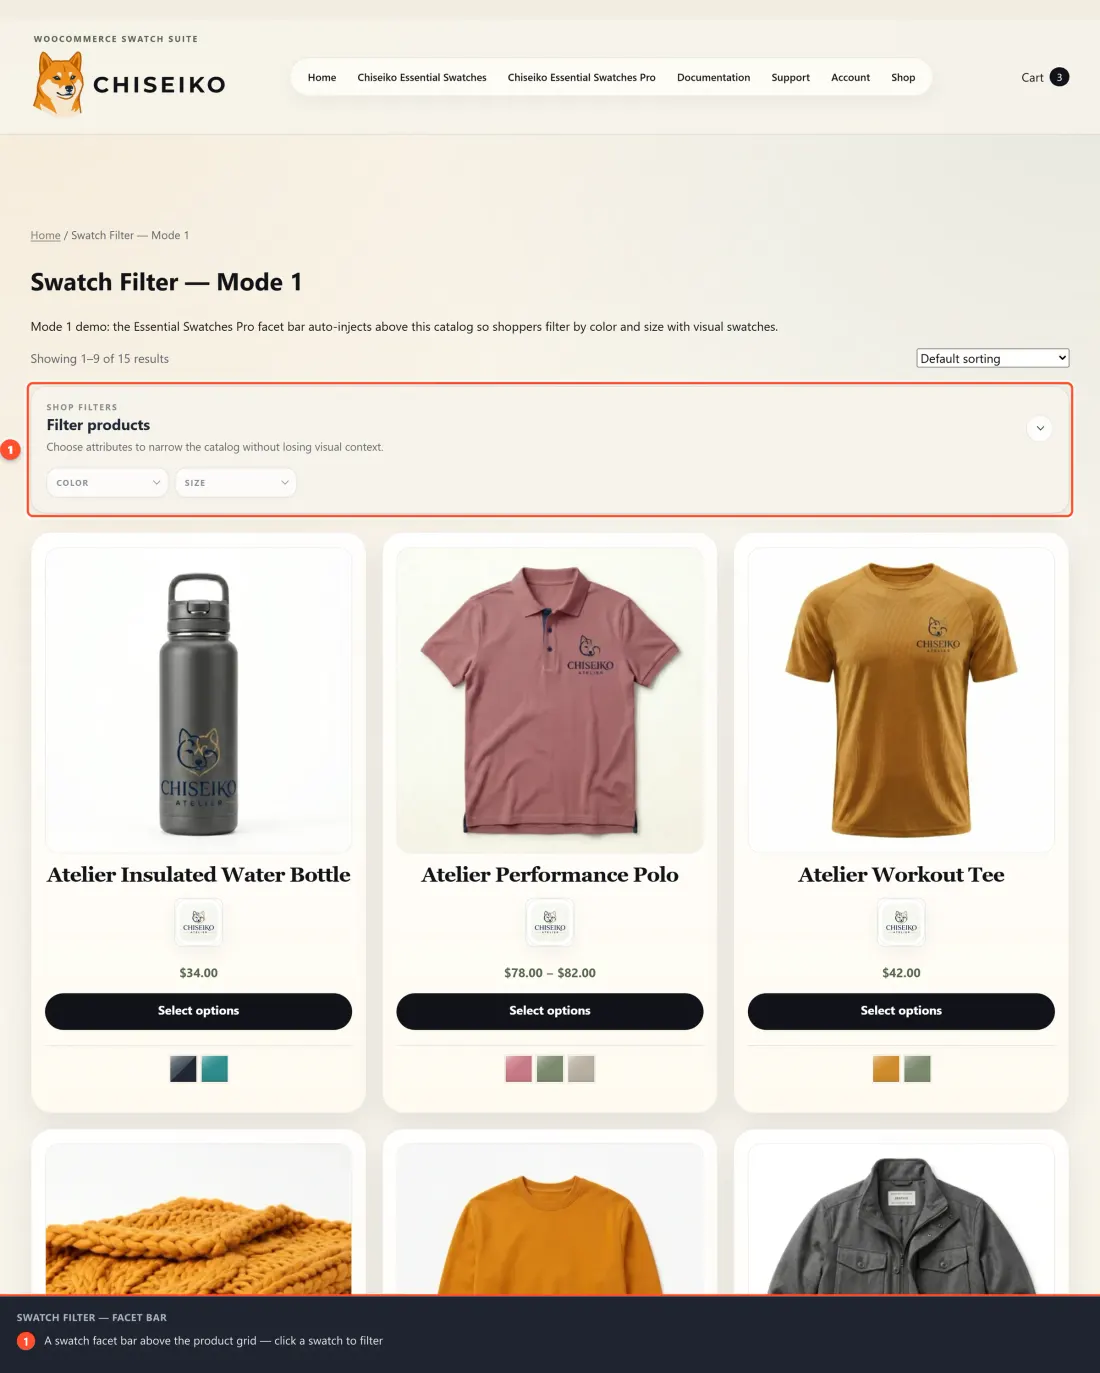
The filter can sit as a facet bar above the grid:
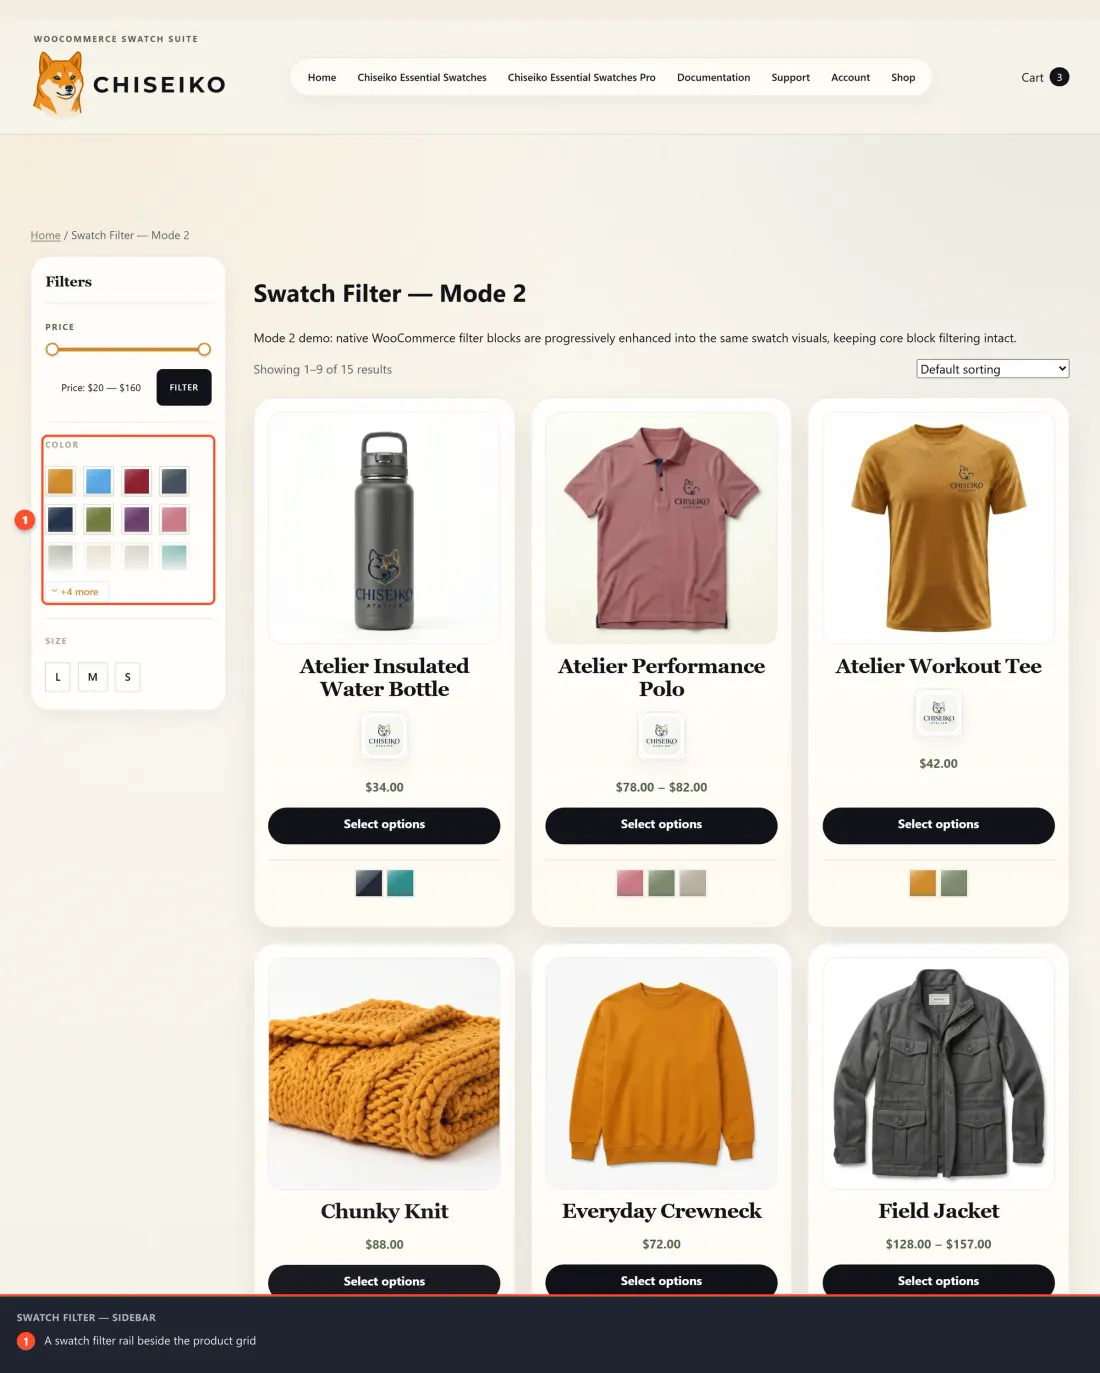
…or as a filter rail beside the grid:
Tips for Best Results
- Set up your swatches first. This filter reuses the swatches you configured for each attribute term (Chapter 2). If a term has no color/image set, it shows as a plain label.
- Don't double up. If you use WooCommerce's own filter blocks, either turn on Enhance WC filter chips or use Auto-inject — not both for the same attribute, or two filter UIs appear.
- Keep counts honest. Hide unavailable swatches prevents shoppers clicking into empty result sets.
- Match your theme. Try the layout presets and the Chip Size / Chip Shape overrides to make the bar feel native to your design.
- Big attribute lists (more than 8 swatches) automatically collapse behind a "+N more" reveal, so the bar stays tidy.
Frequently Asked Questions
Q: Where exactly does the filter appear? A: Only on shop and category (archive) pages. The block, widget, shortcode, and auto-inject all stay hidden on single-product pages, the cart, and other pages.
Q: Do I have to edit my theme to use it? A: No. The easiest path is Auto-inject above product grid on the Display Settings tab — just tick the attributes and save.
Q: Does it reload the whole page when a customer filters? A: On modern WooCommerce it updates the grid in place (AJAX-style). On older setups it falls back to a normal page reload. Both produce the same filtered result.
Q: Can customers filter by more than one attribute at once? A: Yes. Add a filter for each attribute (multiple auto-inject ticks, multiple widgets/blocks, or multiple shortcodes) and customers can combine them — for example Color and Size.
Q: What's the difference between OR and AND? A: OR shows products matching any selected value (e.g. red or blue). AND shows products matching all selected values at once.
Q: The same filter shows up twice — why? A: You likely have both Auto-inject and Enhance WC filter chips active for the same attribute. Turn one of them off.
Q: Why does a swatch look greyed out? A: With Hide unavailable swatches on, swatches with zero matching products under the current filter are dimmed so shoppers don't reach an empty grid.