
Chiseiko Essential Swatches Pro
Attribute-Based Extra Fees
Pro module. Requires Chiseiko Essential Swatches Pro with an active license. Enable the "Attribute-Based Extra Fees" module at WooCommerce → Chiseiko Essential Swatches Pro → Modules.
What Does This Module Do?
Some options cost you more to offer, so it's fair to charge a little more for them. A 3XL shirt uses more fabric. A "premium oak" finish costs more than the standard one. A larger 1-litre bottle costs more than the 250 ml.
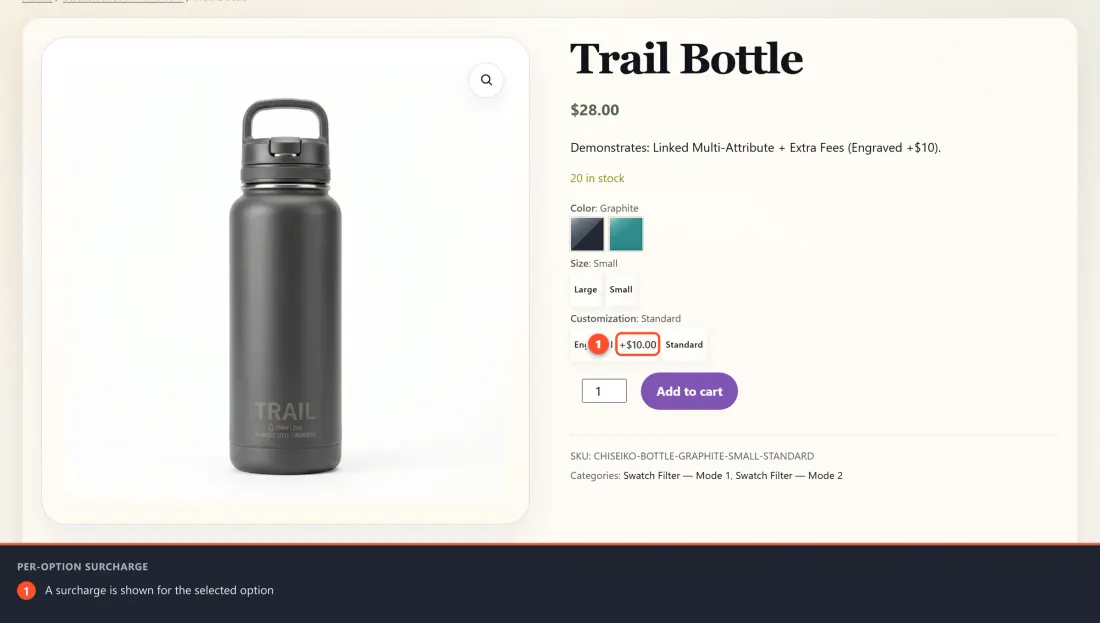
Attribute-Based Extra Fees lets you add a surcharge to a specific swatch option. When a shopper picks that option, a little extra is automatically added to the price — for example "+$5.00" for the XL size or "+10% for the premium finish." No coupons, no manual price edits, no separate "large size" product to maintain.
You set the surcharge in one of two places, depending on how your products are built:
- On a variable product's attribute value (a "term" — like the XL under your Size attribute). Pick the swatch, pay the extra. This is the most common setup.
- On a linked simple product (a member of a Pro linked group — see Chapter 6). The surcharge applies whenever that specific product is added to the cart.
A surcharge can be a flat amount (e.g. +$5.00) or a percentage of the product's price (e.g. +10%). The extra is rolled straight into the item's price, so the shopper sees one clean total — there's no confusing separate "surcharge" line at checkout, and tax is calculated normally using the product's own tax class.
In short:
- Without this module: every option of a product costs the same, or you build separate products to charge more
- With this module: any swatch option can carry its own automatic surcharge, flat or percentage
Enabling the Module
- Go to WooCommerce → Chiseiko Essential Swatches Pro → Modules.
- Check the box next to Attribute-Based Extra Fees.
- Click Save Modules.
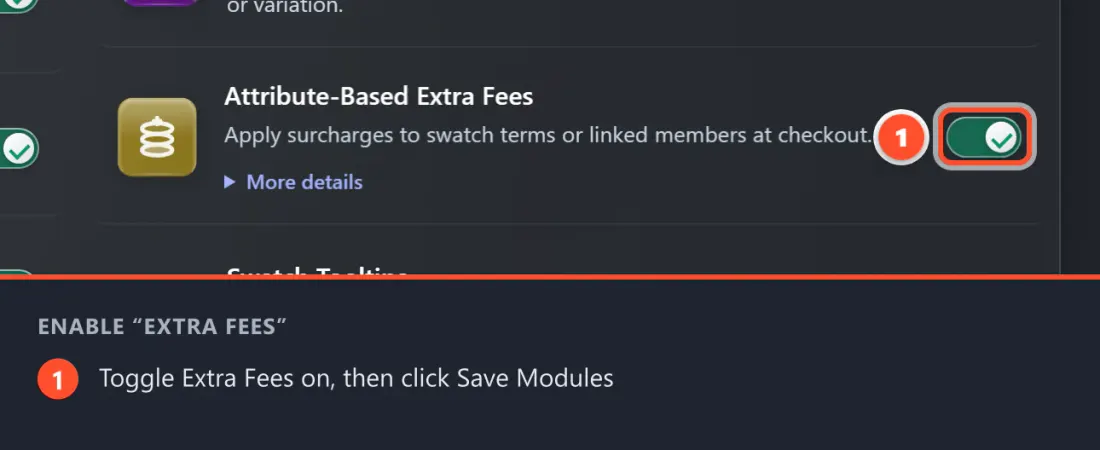
That switches the feature on store-wide. The fee fields described below now appear on your attribute terms and on linked products. Until you actually enter a fee somewhere, nothing changes for your shoppers.
Note: There is no separate "fees" settings tab. Each fee is entered on the attribute term or product it belongs to. The only related global setting is how the surcharge is displayed on swatches — see the tip on Display Mode further down.
Setting a Fee on a Variable Product (attribute term)
This is the everyday case: charge extra when a shopper selects a particular option, like the XL size or the Premium finish. The fee is attached to the attribute value itself, so once set it applies to every variable product that uses that value.
- Go to Products → Attributes.
- Find the attribute that holds the option (for example Size) and click Configure terms next to it.
- Click the term you want to charge for (for example XL) to open its edit screen — or scroll to Add new to create one.
- Find the field labelled Extra Fee / Surcharge.
- In the number box, type the surcharge amount (for example
5for five, or10). - In the drop-down next to it, choose the fee type:
- {currency} Flat fee — a fixed amount in your store currency (e.g. +$5.00).
- % Percentage — a percentage of the product's price (e.g. +10%).
- The helper text reads "Optional surcharge added when this attribute value is selected. Leave blank or 0 for no fee." — so to remove a fee later, just clear the box or set it to
0. - Click Update (or Add new term) to save.
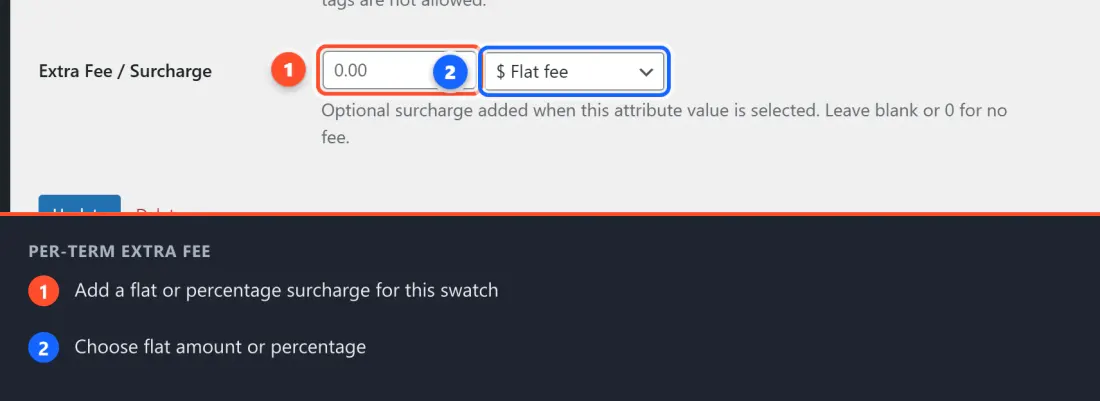
That's it — every variable product whose variation uses that term now carries the surcharge. On the Products → Attributes → (your attribute) terms list you'll also see a new Fee column showing the configured surcharge (e.g. +$5.00 or +10%) at a glance.
Per-product override (optional). If one particular product should charge a different amount than the global term fee, open that product, find the Fee / Surcharge Overrides panel in the Product data area, and fill in the Override Amount and Override Type for the relevant term. The note reads "Override global term fees for this specific product. Leave blank to use the global fee." Entering
0here disables the fee for that one product.
Setting a Fee on a Linked Simple Product
If you sell related items as separate simple products tied together with Linked Products (for example three bottle sizes, each its own product), you can put a surcharge on an individual member. The fee applies whenever that product is added to the cart.
- Go to Products and open the simple product that is a member of a linked group.
- In the Product data area, find the section titled Linked Product Fee / Surcharge. (This section only appears on products that belong to a linked group.)
- In the Fee amount number box, type the surcharge (for example
2). - In the drop-down beside it, choose the fee type:
- {currency} Flat fee — a fixed amount in your store currency.
- % Percentage — a percentage of that product's price.
- The helper text reads "Optional surcharge applied when this linked-group member is added to the cart. Leave blank or 0 for no fee. Stacks with any attribute fees on variable products."
- Click Update to save. To remove the fee later, clear the box or set it to
0.
From then on, the surcharge is shown in that member's price everywhere it appears — on its product page, on shop and category cards, and in the linked swatch strip — and it's charged automatically when the product reaches the cart.
Stacking: If a linked member is itself a variable product, its linked fee and any attribute-term fees on its variations add together on the line item.
What the Customer Sees at Checkout
- On the product page, the shopper selects a swatch that carries a fee (or lands on a linked product that has one).
- The displayed price updates instantly to include the surcharge — no page reload. How the fee is flagged on the swatch itself (a "+$5.00" badge, a hover tooltip, inline text, etc.) depends on your Display Mode setting; the price always reflects the fee regardless.
- They add the item to the cart.
- In the cart, under the product name, a small line spells out the surcharge — for example "Size surcharge: $5.00" for an attribute fee, or "Linked product surcharge" for a linked-member fee.
- The item's price and line total already include the surcharge. There is no separate fee row in the cart totals — the extra is built into the product price, so the subtotal, tax, and grand total are all correct without anything looking out of place.
- The surcharge carries through to the order, so it appears correctly on the order confirmation and in your WooCommerce order records.
Tips for Best Results
Decide flat vs. percentage per option. Flat fees suit fixed up-charges ("+$5 for XL"). Percentage fees suit options whose value scales with price ("+10% for the premium finish" on a $20 item is $2, on a $200 item is $20).
Percentages are based on the regular price. A percentage surcharge is calculated from the product's regular price, not its sale price, so the fee stays consistent whether or not the item is on sale.
Term fee vs. per-product override. Set the fee on the attribute term when every product using that option should be charged the same. Use the Fee / Surcharge Overrides panel on a single product only when that one product needs a different amount (or none).
Choose how the fee shows on swatches. Go to WooCommerce → Chiseiko Essential Swatches Pro → Display Settings and find the Extra Fees — Display Mode card. You can show the fee as a permanent badge, a hover tooltip (default), inline label text, a subtle "smart" dot that expands on hover, or hide the on-swatch indicator entirely. The cart total always reflects the fee no matter which you pick.
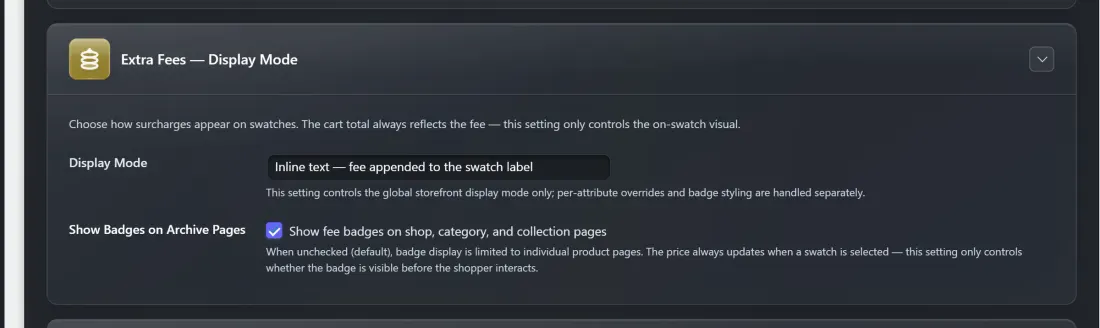
Show or hide badges on shop pages. In that same card, the Show Badges on Archive Pages checkbox controls whether fee badges appear on shop, category, and collection cards. It's off by default to keep product grids clean — the price still updates correctly when a shopper interacts.
Leave blank for no fee. Any option without a fee behaves exactly as normal. You only need to fill in the values you actually want to charge for.
Frequently Asked Questions
Q: Is there a settings page for the fees themselves? A: No. Apart from the on/off toggle under WooCommerce → Chiseiko Essential Swatches Pro → Modules and the Display Mode card under Display Settings (which only controls how the fee looks on swatches), every fee amount is entered on the attribute term or the product it applies to.
Q: Will customers see a separate "surcharge" line in the cart totals? A: No. The fee is rolled into the item's price, so the totals stay clean. The cart does show a short note under the product name (e.g. "Size surcharge: $5.00") so the shopper understands where the extra came from, but there's no extra row in the totals.
Q: How is tax handled on the surcharge? A: Because the fee is added to the product's own price rather than as a separate charge, tax is calculated using the product's normal tax class — exactly as it would be for the base price.
Q: Can a flat fee and a percentage fee both apply to the same item? A: Yes. Fees from different sources stack additively. For example, a variable linked product can carry both an attribute-term fee on its size and a linked-member fee on the product itself — both are added to the line item.
Q: I set a percentage fee — is it based on the sale price or the regular price? A: The regular price. This keeps the surcharge the same whether or not the item happens to be on sale.
Q: How do I remove a fee I set earlier?
A: Open the term or product, clear the amount box (or set it to 0), and save. A blank or zero value means no fee.
Q: I enabled the module but don't see the Linked Product Fee section. Why? A: That section only appears on products that are members of a Pro linked group. If the product isn't linked yet, set up its linked group first (see Chapter 6), then the fee field will appear.
Q: Does the price on the product page update before adding to cart? A: Yes. When a shopper selects a fee-bearing swatch, the displayed price updates immediately to include the surcharge, so there are no surprises at checkout.