
Chiseiko Essential Swatches Pro
Auto-Assign Images
Pro module. Requires Chiseiko Essential Swatches Pro with an active license. Enable the "Auto-Assign Images" module at WooCommerce → Chiseiko Essential Swatches Pro → Modules.
What Does This Module Do?
Image swatches look great — instead of a flat color dot, a shopper sees an actual photo of the fabric, the wood grain, or the printed pattern. But setting them up by hand is tedious. For every single term (every color, every material, every finish) you would normally have to open the attribute, click "Upload/Add image," dig through your Media Library, and pick the right file. On a store with dozens of colors across several attributes, that's a lot of clicking.
Auto-Assign Images does that work for you in one pass. It looks at the images already sitting in your Media Library, matches them to your attribute terms automatically, and sets each matching image as that term's swatch image. You upload your images once (named sensibly) and let the tool wire them up.
In short:
- Without this module: open each term, hunt for the right file, and assign it by hand — one term at a time.
- With this module: pick an attribute, click one button, and every term that has a matching image in your Media Library gets its swatch image set automatically.
How does it match? It compares the file name of each image (without the extension) against the slug of each term. If they're identical, that image becomes the term's swatch image. For example, an image named red.jpg is assigned to the term whose slug is red. That's the whole rule — match the file name to the term slug.
This is a one-click "run now" tool, not something that happens automatically when you upload. You choose when to run it, and you run it per attribute. It does not rename your files, delete anything, or change the images themselves — it only sets which existing image is used as each term's swatch.
Enabling the Module
- Go to WooCommerce → Chiseiko Essential Swatches Pro → Modules.
- Check the box next to Auto-Assign Images.
- Click Save Modules.
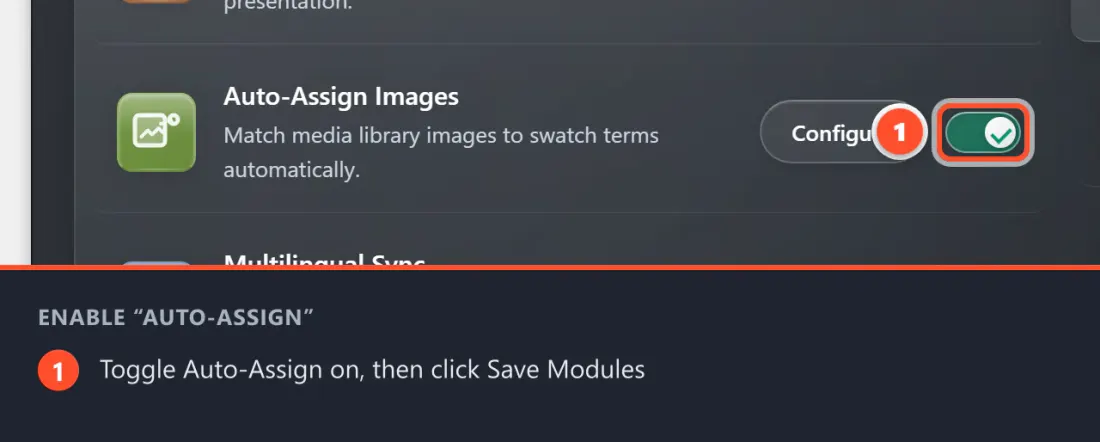
Once enabled, the tool appears under WooCommerce → Chiseiko Essential Swatches Pro → Tools in a card titled Auto-Assign Swatch Images. If the module is off, that card shows a notice asking you to enable it in the Modules tab first.
Preparing Your Images (naming so they match)
The whole feature rests on one simple rule:
The image file name (without its extension) must exactly match the term's slug.
So before you run the tool, name your image files to match your term slugs:
- Term slug
red→ image filered.jpg(orred.png,red.webp, etc.) - Term slug
navy-blue→ image filenavy-blue.jpg - Term slug
oak→ image fileoak.png
A few things that matter because the match is exact:
- It's the slug, not the display name, that counts. A color displayed as "Navy Blue" usually has the slug
navy-blue. Name the filenavy-blue, notNavy Blue. You can see a term's slug under Products → Attributes → (your attribute) → Configure terms, in the Slug column. - Capital letters and spaces matter. Slugs are lowercase with hyphens.
Red.jpgorred .jpgwill not match the slugred. - The extension is ignored. Any normal image type works —
.jpg,.jpeg,.png,.webp,.gif. Only actual image files are considered; PDFs, videos, and other files are skipped. - Upload the images to your Media Library first. The tool only looks inside your existing Media Library (Media → Add New to upload). It does not scan your computer.
Tip: If a term has no image with a matching file name, it's simply left as-is. You can always set those few by hand afterward, or rename the file and run the tool again.
Running Auto-Assign
Go to WooCommerce → Chiseiko Essential Swatches Pro → Tools and find the Auto-Assign Swatch Images card.
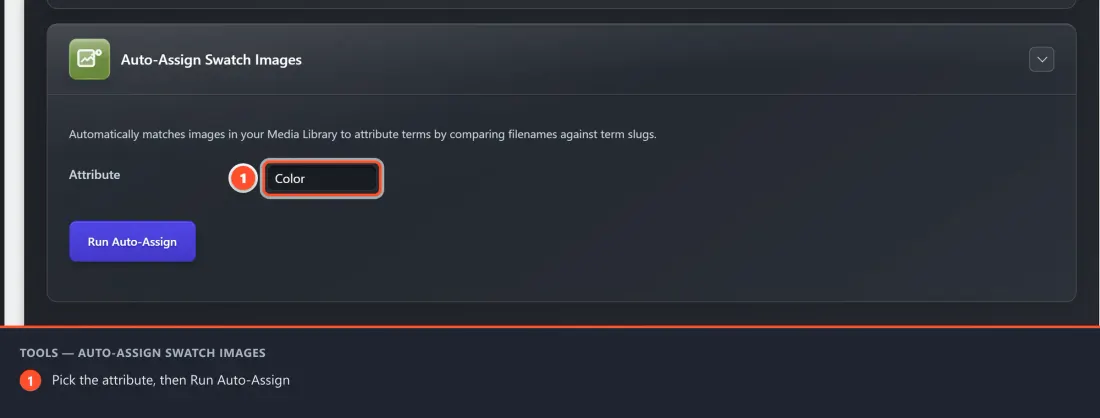
- Read the short description at the top of the card: "Automatically matches images in your Media Library to attribute terms by comparing filenames against term slugs." That's the rule in action.
- In the Attribute dropdown, choose the attribute you want to process — for example Color, Material, or Finish. Each WooCommerce attribute is listed by its display name. The tool runs on one attribute at a time.
- Click the Run Auto-Assign button.
- Watch the status line just below the button. While it works, it shows progress such as "Processing… (12 assigned so far)", counting up as it goes. Large attributes are handled in batches automatically, so big libraries won't time out.
- When it finishes, the status line turns green and shows a summary like "34 image(s) assigned." — the number of terms that received a matching image on this run.
- To process another attribute, pick a different one from the Attribute dropdown and click Run Auto-Assign again.
That's it. There's nothing to "save" afterward — the swatch images are written the moment the run completes.
Checking the Results
After a run, confirm the images landed where you expect:
- Go to Products → Attributes, click your attribute, then Configure terms.
- Each term that was matched now shows its swatch image thumbnail next to it.
- Open a term to confirm the correct image is attached. If a term you expected to match is still blank, its file name probably doesn't exactly equal the slug (see the naming rules above).
- Visit a product that uses that attribute on the storefront. The image swatches should now render with the assigned photos.
Note: For the assigned images to display as image swatches on the storefront, those terms should be set to the Image swatch type. Auto-Assign fills in which image each term uses; the swatch type is set per term in the attribute screen (see Chapter 02).
Tips for Best Results
- Name files before you upload. It's far easier to name a batch of files on your computer (
red.jpg,blue.jpg,green.jpg) than to rename them later. Match each name to its term slug. - Check your slugs first. When in doubt, copy the exact slug from Products → Attributes → Configure terms and use that as the file name. Don't guess from the display name.
- Run once per attribute. If you have Color, Material, and Finish attributes, run the tool three times — once for each.
- Re-run any time. The tool is safe to run again. Add more correctly-named images, run it again, and only the newly-matched terms change. Existing matches that still match stay put.
- Use consistent, web-friendly images. Square images of similar size make the neatest swatch grids. Keep file sizes reasonable for fast pages, as you would for any product image.
- Mix manual and automatic freely. Anything the tool couldn't match, you can still assign by hand. The two approaches don't conflict.
Frequently Asked Questions
Q: Does this run automatically when I upload an image? A: No. It's a manual, on-demand tool. You choose the attribute and click Run Auto-Assign each time you want it to run.
Q: How exactly does it decide which image goes with which term?
A: It compares the image's file name (without the extension) to the term's slug. If they're identical — for example oak.png and the slug oak — that image is assigned. Nothing else (titles, captions, alt text) is used.
Q: It assigned nothing / skipped a term I expected. Why? A: Almost always a naming mismatch. The file name must equal the slug exactly — lowercase, hyphens, no spaces, no capital letters. Check the term's Slug under Products → Attributes → Configure terms and rename the file to match, then run again.
Q: Does it work on all my attributes at once? A: No — you select one attribute from the Attribute dropdown per run. Run it again for each additional attribute.
Q: Will it overwrite swatch images I set by hand? A: It sets the swatch image for any term it finds a matching file for. If a term already had an image and a matching file exists, the matched image is what's stored. Terms with no matching file are left untouched, so your hand-set images for unmatched terms are safe.
Q: Does it change or rename my actual image files? A: No. It never renames, moves, edits, or deletes anything in your Media Library. It only records which existing image each term uses as its swatch.
Q: What file types are supported?
A: Standard web image formats — .jpg, .jpeg, .png, .webp, .gif. Non-image files (PDFs, videos, etc.) are ignored, even if their name matches a slug.
Q: I have a very large Media Library. Will the tool time out? A: No. It processes terms in batches and keeps going until it's done, updating the "…assigned so far" count as it works. Just leave the page open until you see the final "image(s) assigned." summary.
Q: The Auto-Assign card shows a "enable the module" notice. What now? A: The module is switched off. Go to WooCommerce → Chiseiko Essential Swatches Pro → Modules, tick Auto-Assign Images, click Save Modules, then return to the Tools tab.