
Chiseiko Essential Swatches Pro
Swatch Grouping
Pro modules. Requires Chiseiko Essential Swatches Pro with an active license. Enable "Swatch Grouping" (for variable products) and/or "Linked Swatch Grouping" (for linked simple products) at WooCommerce → Chiseiko Essential Swatches Pro → Modules. Linked Swatch Grouping also requires the Linked Simple Products module (see Chapter 6).
What Does This Module Do?
When a product has a long list of swatches, a single flat row can feel overwhelming. A scarf that comes in 30 colors, or a fabric sample that comes in dozens of materials, turns into a wall of buttons that customers have to scan all at once.
Swatch Grouping fixes this by sorting your swatches into named, collapsible sections. Instead of one long row, customers see tidy headings like:
- Reds, Blues, Greens (grouped by color family)
- Cotton, Linen, Wool (grouped by material)
- Solid Colors, Patterns (grouped by style)
Each group shows its name as a heading. Customers can click a heading to expand or collapse that section, so they can focus on the colors or materials they actually care about.
You decide the group names and which swatches belong in each one. Any swatch you do not assign to a group is automatically placed in an "Other" section at the bottom, so nothing ever disappears.
There is no settings tab for either module — grouping is configured directly on your products and attributes, which is what the rest of this chapter walks through.
Two Versions: Variable vs Linked
Chiseiko Essential Swatches Pro ships two grouping modules because there are two ways stores sell color variants. You enable whichever one matches how your products are built — or both.
| Your setup | Module to use | Where you define groups |
|---|---|---|
| One variable product with many variations (e.g. one "Silk Scarf" listing with 30 colors) | Swatch Grouping | On each attribute term (the color/material values) |
| Separate simple products linked together (e.g. "Rose Cream", "Ivory Cream" as their own products — see Chapter 6) | Linked Swatch Grouping | On each product, in its Swatches product-data tab |
If you use both kinds of product, enable both modules. They share the same look on the front-end (the same collapsible group headings), so customers get a consistent experience either way.
Enabling the Module(s)
- Go to WooCommerce → Chiseiko Essential Swatches Pro → Modules.
- Tick Swatch Grouping if you sell variable products and want grouped swatches on them.
- Tick Linked Swatch Grouping if you sell linked simple products (this one also needs Linked Simple Products ticked).
- Click Save Modules.
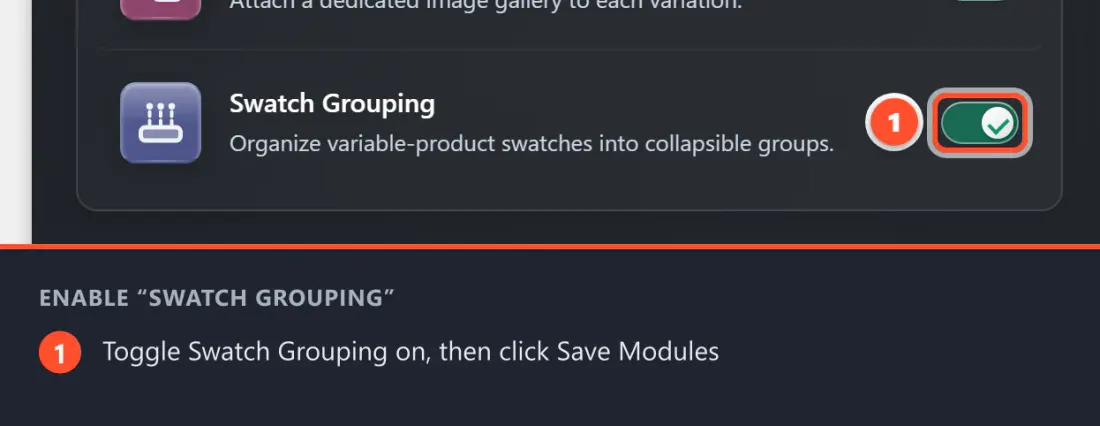
That is all the setup the modules need. The actual groups are created on your attributes/products, described next.
Creating Groups (Variable Products)
For variable products, groups are defined on the attribute terms — the individual color or material values themselves. You give each term a group name, and every term that shares the same name is bundled together under that heading.
Step 1 — Open your attribute's terms
- Go to Products → Attributes.
- Find the attribute you use for this product (for example, Color or Material).
- Click Configure terms next to it.
This opens the list of values for that attribute (e.g. Crimson, Scarlet, Navy, Sky Blue).
Step 2 — Edit a term and set its group
- Hover over a term (e.g. Crimson) and click Edit.
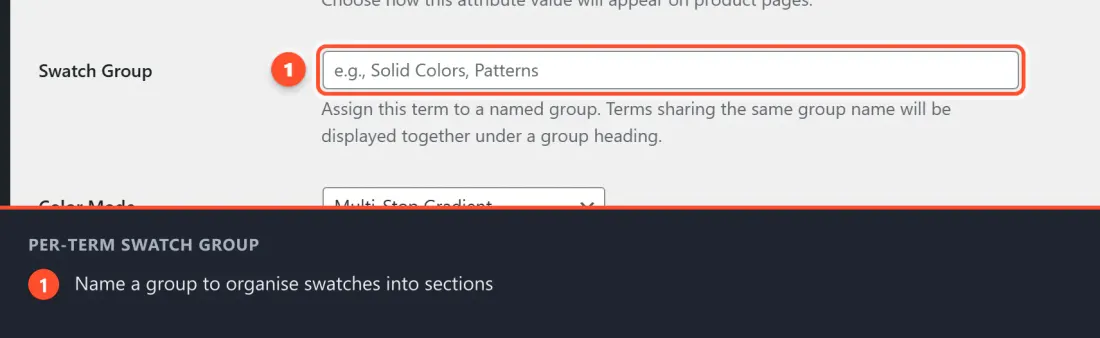
- Scroll to the field labelled Swatch Group.
- Type the name of the group this color belongs to — for example
Reds. (The field shows a hint like e.g., Solid Colors, Patterns to guide you.) - Click Update.
Step 3 — Repeat for the other terms
Give every term a Swatch Group name:
- Crimson →
Reds - Scarlet →
Reds - Navy →
Blues - Sky Blue →
Blues
Terms that share the exact same group name are displayed together. Spelling and capitalisation must match — Reds and reds would create two separate groups.
Step 4 — Check the Group column
Back on the attribute's term list, a new Group column shows each term's assigned group at a glance, so you can confirm everything is sorted correctly without opening each one. You can click the column to sort by group.
Leaving a term blank is fine. Any term without a Swatch Group name simply lands in the automatic Other section at the end. To remove a term from a group later, just clear its Swatch Group field and update.
Once your terms are grouped, the swatches automatically appear in those sections on every variable product that uses that attribute — no per-product setup needed.
Creating Groups (Linked Simple Products)
For linked simple products, each color is its own separate product, so the group is set per product rather than per attribute term.
Requires the Linked Simple Products module. Your products must already be linked together as described in Chapter 6. If they are not linked, there is no swatch strip to group.
Step 1 — Open a product in the group
Go to Products, open one of the linked products (e.g. Rose Face Cream), and in the Product data box click the Swatches tab (the same tab you used to link the products in Chapter 6).
Step 2 — Set its Swatch Group
In that tab, find the field labelled Swatch Group and type the group name this product belongs to — for example Warm Tones. (The hint reads e.g. Solid Colors, Patterns.) Then Update the product.
Step 3 — Repeat for each linked product
Open each product in the linked set and give it a Swatch Group name:
- Rose Face Cream →
Warm Tones - Ivory Face Cream →
Warm Tones - Charcoal Face Cream →
Cool Tones
Products sharing the same group name collapse into one named section in the linked swatch strip. Any linked product left without a group name (and any plain-URL swatch) goes into the automatic Other section at the end.
Multi-attribute linked products: if your linked products are configured with multi-attribute (matrix) swatches, those rows reuse the same Swatch Group values you set on your attribute terms in the variable-product section above. You do not have to define groups twice.
What the Customer Experience Looks Like
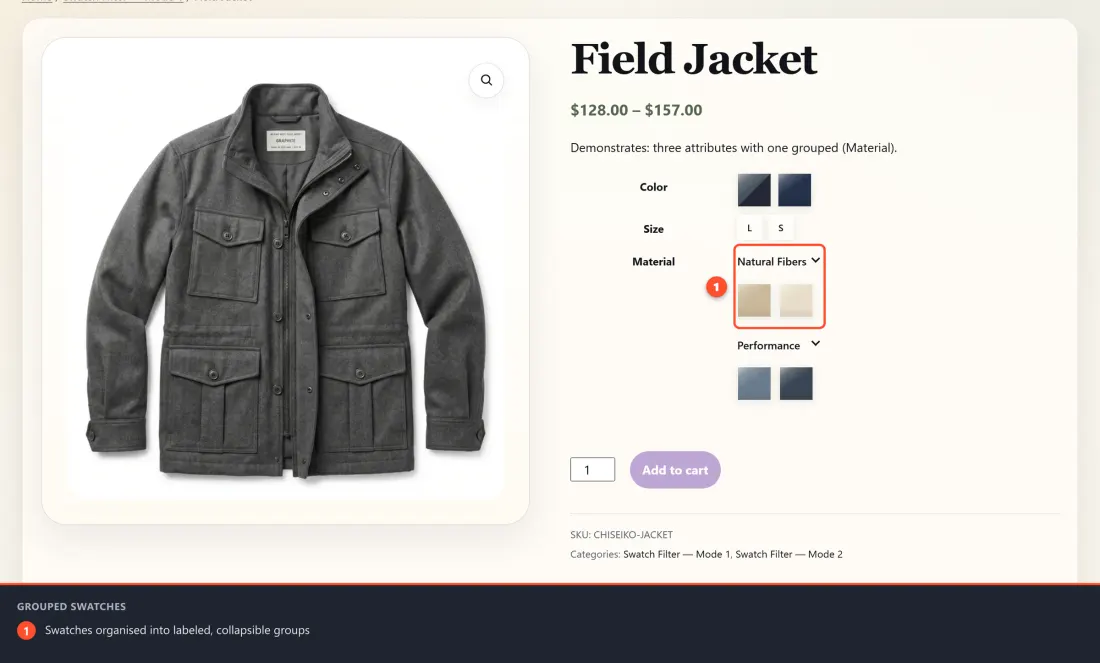
On the product page, instead of one long row of swatches, the customer sees the swatches split into clearly labelled sections:
Reds  ▾
[Crimson] [Scarlet] [Maroon]

Blues  ▾
[Navy] [Sky Blue] [Teal]

Other  ▾
[Beige] [White]
- Each section shows its group name as a heading.
- Every heading is a button — clicking it collapses or expands that group, so customers can hide sections they are not interested in.
- All groups start expanded so nothing is hidden by default.
- The Other section appears only when some swatches were not assigned to a group, and it always sits at the bottom.
Selecting a swatch works exactly as it normally does — grouping only changes how the swatches are organised, not how they behave.
Tips for Best Results
- Match group names exactly. Terms or products are grouped by an exact text match.
RedsandRedare two different groups. Decide on your names up front and keep them consistent. - Group when you have many swatches. Grouping shines on products with 10+ swatches. For a product with three or four colors, a flat row is usually clearer and grouping adds little.
- Use names customers understand. "Warm Tones" and "Cool Tones" or "Cotton" and "Linen" mean something to shoppers; "Group A" and "Group B" do not.
- You do not have to group everything. It is perfectly fine to group only some swatches and let the rest fall into Other — for example, group your bestsellers and leave the long tail ungrouped.
- Reuse term groups across products. For variable products, grouping is set once on the attribute term and applies everywhere that term is used, so a single edit updates every product that shares the color.
Frequently Asked Questions
Q: I set up groups but the swatches still show as one flat row. A: Check these in order:
- Is the matching module enabled at WooCommerce → Chiseiko Essential Swatches Pro → Modules — Swatch Grouping for variable products, Linked Swatch Grouping for linked products?
- Did you actually save a Swatch Group name on the terms/products?
- For linked products, is the Linked Simple Products module also enabled and are the products linked?
- Clear your site and browser caches and reload. If none of the terms on a product carry a group name, the plugin intentionally leaves the swatches ungrouped.
Q: Where do I configure grouping — is there a settings page? A: No. Neither module has a settings tab. You configure groups directly on the attribute term (variable products) or on the product's Swatch Group field (linked products).
Q: Two groups appeared when I only meant to create one.
A: The group names did not match exactly. Grouping is case- and spelling-sensitive — Reds and reds, or Cool Tones and Cool tone, are treated as separate groups. Edit the odd ones so every name matches exactly.
Q: What happens to swatches I do not put in any group? A: They are placed in an automatic Other section at the bottom of the swatch list. Nothing is ever hidden or dropped.
Q: Can I reorder the groups? A: Groups appear in the order their swatches are first encountered, and Other is always last. To influence ordering, adjust the underlying term order (for variable products) or the product order within the linked group (for linked products).
Q: Do the variable and linked versions look different to customers? A: No. Both render the same collapsible, named group sections, so customers get a consistent experience whether a product is variable or made of linked simple products.