
Chiseiko Essential Swatches Pro
CSV Import / Export
Pro module. Requires Chiseiko Essential Swatches Pro with an active license. Enable the "CSV Import / Export" module at WooCommerce → Chiseiko Essential Swatches Pro → Modules.
What Does This Module Do?
Every swatch on your store — its color, its image, its label, its shape, its tooltip position, and more — is stored as a setting attached to an attribute term (for example, the "Red" value of your "Color" attribute). Editing those settings one term at a time is fine for a handful of swatches, but it gets slow when you have dozens or hundreds.
CSV Import / Export lets you work with all of your swatch settings at once, in a single spreadsheet file.
- Export downloads a CSV file containing every swatch you have configured. You can open it in Excel, Google Sheets, or Numbers.
- Import reads a CSV file back in and applies the changes in bulk.
There are two everyday reasons to use it:
- Back up your swatches. Export the file and keep it safe. If something ever goes wrong, you can import it again to restore your settings.
- Bulk-edit your swatches. Export the file, change colors, labels, shapes, or groups across many rows in your spreadsheet program, then import it back — far faster than clicking through each term by hand.
The import is smart about what it does. It can update swatches you already have, and it can add new terms to attributes that already exist. It does not create brand-new attributes — that is a deliberate WooCommerce action you do under Products → Attributes first.
Enabling the Module
- Go to WooCommerce → Chiseiko Essential Swatches Pro → Modules.
- Check the box next to CSV Import / Export.
- Click Save Modules.
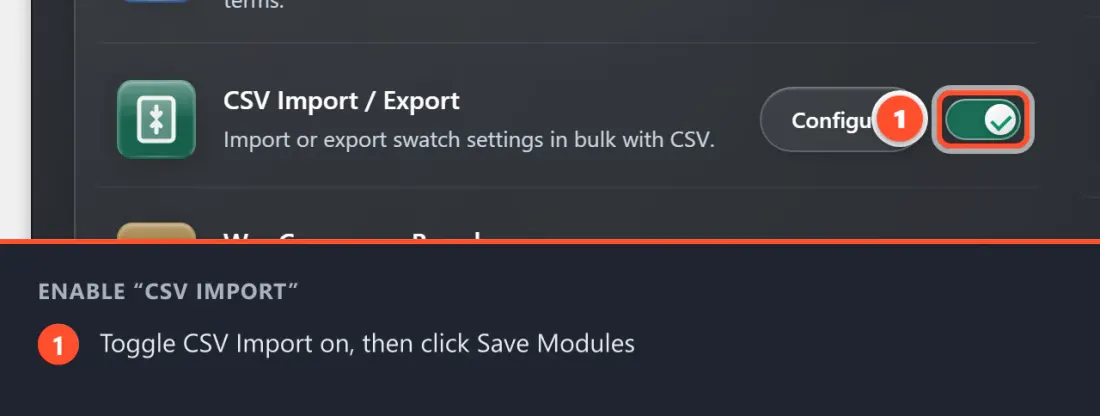
The tools then appear under WooCommerce → Chiseiko Essential Swatches Pro → Tools.
Exporting Your Swatches
Go to WooCommerce → Chiseiko Essential Swatches Pro → Tools and find the CSV Import / Export card. On the left is the Export section.
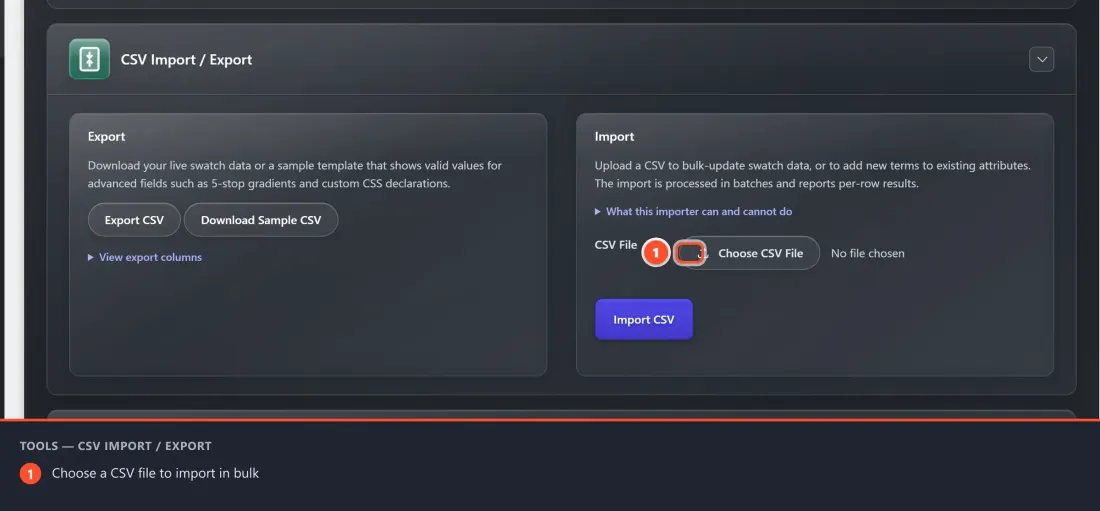
- Click Export CSV. Your browser downloads a file named
chiseikoessw-swatches-export.csvcontaining every swatch term on your store. - (Optional) Click Download Sample CSV instead. This downloads
chiseikoessw-swatches-sample.csv, a small example file showing valid values for the advanced fields (such as a 5-stop gradient and custom CSS). Use it as a reference when you are not sure how a column should be filled in. - There is also a View export columns link that lists the column headers right on the page.
Keep your export somewhere safe — that file is both your backup and your starting point for any bulk edit.
Understanding the CSV Columns
The file has exactly these columns, in this order. Every column must stay present in the header for an import to be accepted.
| Column | What it holds |
|---|---|
term_id |
The internal ID of the swatch term. Used to target an update to an existing term. Leave empty to add a new term. |
attribute |
The attribute the term belongs to, written as a pa_ name (for example pa_color, pa_size). |
slug |
The term's slug (its URL-safe short name, e.g. red). |
swatch_type |
The swatch style: color, image, label, or radio. On export, a term with no swatch set shows as none. |
color |
The swatch color as a hex code (e.g. #ff6b35). |
image_id |
The Media Library image ID for an image swatch. |
label |
The text shown for a label swatch (e.g. Large). |
swatch_group |
The grouping name used by the Swatch Grouping feature. |
shape |
The swatch shape: circle, square, pill, or custom. |
radius |
Corner roundness, a number from 0 to 50. |
color_mode |
How the color is painted: single, dual, or gradient. |
color_2 |
The second hex color, used when color_mode is dual. |
gradient |
The gradient definition, written as JSON (see below), used when color_mode is gradient. |
tooltip_position |
Where the tooltip appears: top, bottom, left, right, or empty. |
custom_css |
Extra CSS declarations applied to the swatch (e.g. border: 1px solid #111827;). |
About the gradient column. It holds a small block of JSON. The sample export shows the exact shape, for example:
{"type":"linear","angle":135,"stops":[{"color":"#ff6b35","pos":0},{"color":"#ff9f1c","pos":25},{"color":"#ffe66d","pos":50},{"color":"#2ec4b6","pos":75},{"color":"#3a86ff","pos":100}]}
You rarely need to type this by hand — set the gradient in the swatch editor, export, and the JSON comes out ready to copy.
Editing the CSV Safely
- Open the exported file in Excel, Google Sheets, or Numbers.
- Do not change the header row. Keep all the column names exactly as they are. The importer checks the header and refuses a file that is missing any required column.
- Edit the values you want. A few rules to keep things smooth:
- To change an existing swatch, keep its
term_id,attribute, andslugexactly as exported, and edit the other columns. The importer matches onterm_idand confirms theattributeandslugstill match before writing — if they do not match, that row is skipped rather than overwriting the wrong term. - To add a new term to an attribute that already exists, leave
term_idempty, setattributeto an existingpa_name, and fill in theslug. - Colors must be hex codes (e.g.
#ff0000). Shapes, swatch types, and color modes must be one of the allowed words listed in the table above.
- To change an existing swatch, keep its
- Save the file as CSV (UTF-8). Do not save it as
.xlsxor.numbers. When your spreadsheet program offers a format, pick "CSV" or "CSV UTF-8."
Why UTF-8 matters: if a swatch uses special characters and the file is saved in the wrong encoding, the import can flag those values. Saving as UTF-8 CSV avoids that.
Importing Your Swatches
On the same Tools page, the Import section is on the right.
- Click Choose CSV File and pick your edited CSV. The chosen filename appears next to the button (it reads "No file chosen" until you select one).
- Click Import CSV.
- A progress bar appears and the file is processed in batches (50 rows at a time), so even large files import without timing out. A Cancel button is available while it runs.
- When it finishes, you see a summary like "Import finished — X created, Y updated, Z skipped."
- Below the summary, a Row-level findings table lists any rows that need attention, with columns for Row, Status, Attribute, Slug, and Reason — so you can see exactly which rows were skipped and why.
After a successful import, visit a product page to confirm the swatches look the way you intended.
What the Protections Do
This module is built to keep both your store and your data safe:
- No accidental overwrites. When a row has a
term_id, the importer confirms the row'sattributeandslugmatch that term before writing. Mismatched rows are skipped, never silently rewritten. - No surprise attributes. Rows that would create a brand-new attribute taxonomy are rejected. You create attributes under Products → Attributes first.
- Bad values become warnings, not failures. If a gradient, hex color, radius, shape, tooltip, or CSS value is malformed, the row still imports — the bad value is dropped and the issue is reported in the findings table, so nothing is silently lost.
- Formula-injection protection on export. Cells that begin with
=,+,-, or@are written so that Excel, LibreOffice, and Google Sheets treat them as plain text instead of running them as formulas. This is a standard spreadsheet-security safeguard. - Real file checks on import. The uploaded file's actual type is verified (not just its name), there is a 10 MB size limit, and the temporary upload is deleted right after it is read. Only users who can manage WooCommerce can run the tools.
Tips for Best Results
- Always export first, then edit. Starting from a real export guarantees you have the exact columns,
term_ids, and JSON formats the importer expects. - Re-export to get a clean template. If an import complains about a missing column, just re-export from this site — the file you get back always has the correct header set.
- Back up before a big bulk edit. Keep the original export untouched so you can re-import it if a change does not go the way you expected.
- Check the findings table. A "skipped" count is not a failure — it is the importer telling you which rows did not match. Read the reason and fix those rows.
- Use the sample file for advanced fields. When in doubt about gradients or custom CSS, open the sample export and copy its formatting.
Frequently Asked Questions
Will importing delete swatches I don't include in the file? No. The importer only touches the rows in your file. Terms not listed are left exactly as they are.
Can I create a new attribute (like a new "Material" attribute) through the CSV?
No. New attribute taxonomies must be created under Products → Attributes first. Once the attribute exists, you can add its terms through the CSV by leaving term_id empty.
What does none mean in the swatch_type column?
On export, none marks a term that has no swatch type set. If you re-import a none row that points at an existing term, it clears that term's swatch type.
My import says some rows were "skipped." Did it break?
No. Skipped rows are reported with a reason in the findings table — usually because the attribute or slug did not match the term_id, or a new-term row was missing its slug or pointed at an attribute that does not exist. Fix those rows and import again.
Is there a limit on file size or row count? Yes. Uploads are capped at 10 MB, and an import processes up to 10,000 data rows. For most stores this is far more than enough.
Do I need to keep the columns in order? The importer matches columns by their header name, so the order is flexible — but all the required columns must be present. The simplest safe path is to leave the exported header exactly as it came.